Biological and spiritual properties of cinnamon and how to incorporate cinnamon in your Reiki healing sessions. […]
Source: Healing with Cinnamon
Biological and spiritual properties of cinnamon and how to incorporate cinnamon in your Reiki healing sessions. […]
Source: Healing with Cinnamon

Blueberry Buckle with Brown Sugar Topping is a classic and indulgent dessert that tantalizes the taste buds with a perfect blend of sweet and tart flavors. This delectable treat typically features a moist and tender cake base generously studded with plump, juicy blueberries. The berries burst with flavor, creating pockets of sweetness throughout the buckle.
What sets this dessert apart is the delightful brown sugar topping that crowns the cake. A heavenly mixture of brown sugar, butter, and sometimes cinnamon or nutmeg is sprinkled generously over the batter before baking. As the buckle bakes, this topping caramelizes, forming a luscious and slightly crunchy layer that adds depth and richness to every bite.
The cake itself is a comforting combination of pantry staples – flour, sugar, butter, eggs, and leavening agents – but it’s the addition of buttermilk or sour cream that imparts a subtle tanginess and ensures a moist crumb. The batter is carefully folded with the blueberries to ensure an even distribution of the fruit throughout the cake.
Once baked to golden perfection, the Blueberry Buckle is often allowed to cool slightly before being sliced into generous portions. The aroma of sweet blueberries and warm spices wafts through the air, inviting anyone nearby to indulge in this delightful dessert.
This timeless treat is not only a favorite for dessert but also doubles as a delightful addition to brunch or afternoon tea. The burst of blueberries, the tender cake, and the irresistible brown sugar topping make Blueberry Buckle a crowd-pleaser that captures the essence of homemade comfort with every heavenly bite. Whether served warm or at room temperature, this dessert embodies the simple joys of baking and is sure to become a cherished recipe in any culinary repertoire.
Servings: 8
– For the cake:
– 2 cups all-purpose flour
– 1 1/2 teaspoons baking powder
– 1/2 teaspoon salt
– 3/4 cup granulated sugar
– 1/4 cup unsalted butter, softened
– 1 large egg
– 1 teaspoon vanilla extract
– 1/2 cup milk
– 2 cups fresh blueberries
– For the topping:
– 1/2 cup brown sugar
– 1/3 cup all-purpose flour
– 1/2 teaspoon ground cinnamon
– 1/4 cup unsalted butter, chilled and diced
1. Preheat your oven to 375°F (190°C) and grease a 9-inch square baking dish.
2. For the cake, in a medium bowl, whisk together the 2 cups of flour, baking powder, and salt.
3. In another large bowl, cream together the 3/4 cup granulated sugar and 1/4 cup softened butter until light and fluffy. Beat in the egg and vanilla extract.
4. Gradually add the flour mixture to the butter mixture, alternating with the milk, and mix just until incorporated. Gently fold in the blueberries and spread the batter evenly in the prepared baking dish.
5. For the topping, combine the brown sugar, 1/3 cup flour, and cinnamon in a bowl. Cut in the chilled butter with a pastry blender or your fingers until the mixture resembles coarse crumbs. Sprinkle evenly over the batter in the dish.
6. Bake for 35 to 40 minutes, until a toothpick inserted in the center comes out clean and the topping is golden brown.
7. Allow the buckle to cool slightly before slicing and serving warm.
Variations & Tips:
– If blueberries aren’t your berry of choice, feel free to substitute them with blackberries or a mix of berries for a Summer Berry Buckle.
– For those with dietary restrictions, swap the all-purpose flour with your preferred gluten-free blend and use a plant-based milk and butter to keep it dairy-free.
– Sprinkle chopped nuts into the topping for an added crunch.
– To ensure the cake remains moist, do not overmix the batter once you’ve added the flour.
– Remember, the buckle can be quite hot coming out of the oven, so let it sit for a moment before serving – especially to the little ones. Enjoy this buckle with love, and watch it become a new tradition in your home as it has in mine.

1 cup (250g) natural peanut butter (no added sugar or oil)
1/2 cup (100g) granulated sugar substitute (such as erythritol or stevia)
1 large egg
1 teaspoon vanilla extract
1/2 teaspoon baking soda
1/4 teaspoon salt
Preheat and Prep Preheat your oven to 350°F (175°C). Line a baking sheet with parchment paper.
Mix Wet Ingredients In a mixing bowl, combine the natural peanut butter, granulated sugar substitute, large egg, and vanilla extract. Mix until the ingredients are well incorporated and the mixture is smooth.
Add Dry Ingredients Add the baking soda and salt to the wet mixture. Stir until the dry ingredients are fully integrated into the dough.
Shape the Cookies Scoop small portions of dough, about 1 tablespoon each, and roll them into balls. Place the cookie dough balls on the prepared baking sheet, leaving some space between them.
Create Cookie Marks Using a fork, gently press down on each cookie dough ball to create a crisscross pattern on top. This also helps flatten the cookies slightly.
Bake to Perfection Bake the cookies in the preheated oven for about 10-12 minutes, or until they are lightly golden around the edges. Keep in mind that they will continue to firm up as they cool.
Cool and Enjoy! Once out of the oven, let the cookies cool on the baking sheet for a few minutes before transferring them to a wire rack to cool completely. The cookies will become slightly more stable as they cool.

1 tablespoon olive oil
1 tablespoon butter
1 medium white onion, finely diced
1 carrot, peeled and finely diced
1 rib celery, finely diced
Salt
Black pepper
4 cloves garlic, pressed through garlic press
1 pound ground beef (85/15 ratio lean to fat)
1 ½ teaspoons Italian seasoning
½ teaspoon white pepper
1 tablespoon tomato paste
2 tablespoons Worcestershire sauce
3 level tablespoons all-purpose flour
1 ¼ cups beef stock or broth
1 medium russet potato, peeled and diced into ¼ -½ inch cubes
2 teaspoons fresh thyme leaves, plus extra for garnish
1 tablespoon finely chopped parsley
¼ cup green peas
2 (17.3 ounce) packages puff pastry sheets, frozen
1 egg, whisked for egg wash
Flaky salt, optional garnish
Begin by gathering and prepping all of your ingredients (except for the puff pastry sheets—keep those frozen) according to the ingredients list above.
Place a large, deep skillet or Dutch oven oven medium-high heat, and add the butter and the olive oil. Once the butter is melted, add in the onion, carrot, celery, plus a couple of good pinches of salt and pepper, and saute the veggies for a few minutes until just softened.
Add in the garlic, and once aromatic, add in the ground beef along with the Italian seasoning, the white pepper plus a couple more pinches of salt and pepper, and use your spoon or spatula to crumble the beef into a fine consistency, cooking it for a few minutes until no longer pink.
Next, add in the tomato paste along with the Worcestershire sauce and stir that into the beef mixture, then sprinkle in the flour and stir that in to blend well.Add in the beef stock or broth, followed by the diced potato, and stir to combine. Cover the pan and allow the filling to gently simmer just until the potatoes are tender and the sauce thickened, roughly 25-35 minutes.
To finish the filling, add the thyme leaves, the chopped parsley and the peas, and stir to combine. Check to see if any additional salt or pepper is needed, and allow the beef filling to completely cool.
Once your filling is nearly cooled, take your puff pastry sheets out of the freezer (you should have a total of 4 sheets), and allow them to thaw at room temp, roughly 40 to 45 minutes (if the pastry sheets thaw before your filling has cooled, place them into the fridge to keep cold.)
When the puff pastry sheets have thawed, place one sheet at a time in front of you on a work surface. Roll the puff pastry sheet out to a size that is 10 by 10 inches, and cut it into 4, 5 inch squares. Place the squares onto a wax or parchment paper-lined sheet tray to hold while you repeat the process with all of the puff pastry sheets, placing more parchment paper or wax paper between layers of squares as needed to help prevent sticking.
Once all of your puff pastry sheets are rolled and cut into 5” squares (you should end up with 16 squares in total), then place about 4 squares at a time in front of you. Add about ½ cup of the beef filling to the center of each square, forming it so that it is a slightly rectangular shaped mound, leaving some border to allow for sealing.
Wet the edges of the filled square with a touch of water, and place another puff pastry square over top, covering the filling as if you were making a pie. Press the edges together (you can use a fork for this), then trim any excess edge to create a smaller “package” or rectangular parcel. Place onto a large baking sheet lined with parchment paper (or use two baking sheets, if needed), and repeat the process by assembling the rest of the hand pies. (You will have a total of 8 hand pies once assembled.)
Once assembled, cut 2 to 3 small slits or “vents” into the top of each hand pie, to allow steam to escape while they bake. Then, place the hand pies into the freezer for 15-20 minutes to chill.
Preheat your oven to 400°.
Once chilled, brush some egg wash over each savory hand pie, sprinkle with a small touch of flaky salt, if using, and bake them for 24 to 26 minutes, or until a deep, golden brown.
Allow the hand pies to cool for 10 minutes on a wire rack before eating, as the filling will be very hot.

1. To remove the odour from your hands after cutting onions, chicken or fish, just wash your hands with salt and water, then you will have no more smell.
2. To avoid the feeling of the hotness of pepper on your hands after cutting/slicing it with your hands, rub them with salt and vegetable oil or red oil and wash them.
3. When pepper mistakenly enter your eye, put a pinch of salt in your mouth, the hotness of the pepper will disappear and you will see the magic.
4. When storing empty containers or bottle, throw in a pinch of salt to help them from getting stinky.
5. Sprinkling some salt on your fresh peppers while pounding it, helps to make it pound quickly.
6. Soaking bitter leaves in salt and hot water, helps to remove extra bitterness before cooking with it.
7. If your liquid milk always spoil before you finish it, You can add pinch of salt when you first open it, it will help the milk to stay fresh longer.
8. Salt and detergent mixture can help you to kill ants and cockroaches disturbing you in the kitchen.
9. Placing your overripe tomatoes in a cold and salty water overnight, will help to make them fresh and firm.
10. If you cut lemon and you do not want to use it finish, sprinkle salt on it, it would stay fresh for 3 days. Make sure you rinse it before using it again.
11. Salt can be used as a preservative method for preserving meat, fish or vegetables. It helps to prevent bacteria growth.
12. Grease fires or small fire can be put out with the use of salt.
13. To store your fermented locust beans (ogiri, iru or dawadawa), mix it with salt and put it in a container. Your fermented locust beans will stay fresh for years without getting spoil.
14. When boiling eggs, add a pinch of salt to keep the shells from cracking and peeling the eggs will also be easy.
15. If you don’t want your spaghetti to gum together while cooking, add a drop of vegetable oil into a salty boiling water and it will come out separately.
16. Soaking your rice with hot water and salt before cooking it, will help to remove excess starch.
17. You can use salt to parboil your rice in order to remove the starch from the rice quickly.
18. Adding salt on your cocoyam when it starts boiling helps to make it soften quickly.
19. Salt is used to sanitize your kitchen sponges. It is used to kill the bacteria, germs in them. Soak the sponge in a hot salty water.
20. Salt improves the texture of the meat as it helps to break down the tough proteins, thus tenderizing the meat.
21. When chopping/cutting vegetables, sprinkle little salt onto the chopping/cutting board, it will keep the vegetables from moving or flying around while cutting/chopping.

You will devour these taco cupcakes! A fun twist on taco night. ![]()
![]() ”
”
Main Ingredients:
Ground beef ![]() : 1 lb
: 1 lb
Taco seasoning ![]() : 1 packet
: 1 packet
Black beans ![]() : 1 can
: 1 can
Cheddar cheese ![]() : 1 cup, shredded
: 1 cup, shredded
Green onions ![]() : 3, chopped
: 3, chopped
Won ton wrappers ![]() : 24
: 24
Instructions:
Preheat the oven to 375°F (190°C). Grease a 12-cup muffin tin.
In a skillet over medium heat, cook the ground beef until browned. Drain excess fat.
Stir in the taco seasoning and cook according to packet instructions. Remove from heat.
Press a won ton wrapper into each muffin cup, allowing the edges to extend over the sides.
Layer each won ton wrapper with a spoonful of taco meat, a spoonful of black beans, a sprinkle of cheddar cheese, and some chopped green onions.
Fold the edges of the won ton wrappers over the filling, creating a cupcake shape.
Bake in the preheated oven for 18-20 minutes, or until the won ton wrappers are golden brown and crispy.
Remove from the oven and let cool in the pan for a few minutes before transferring to a serving platter.
Serve warm with your favorite taco toppings like salsa, sour cream, or guacamole.
Enjoy your delicious taco cupcakes! ![]()
![]()

Ingredients :
1 package Cheddar Bay Biscuit Mix
1 tsp garlic
1 tsp Italian Seasoning
Crab:
1 pound lump crab meat, be sure it is fully cooked
¼ tsp paprika
½ tsp onion powder
½ + cup mayonnaise
1 tbsp mustard
½ sleeve Ritz crackers, crushed
1 cup grated parmesan
How To Make Crab Stuffed Cheddar Bay Biscuits with Lemon Butter:
Make the biscuit mix according to package directions, set to the side.
Preheat the oven to 375*, spray two muffin tins with nonstick spray.
In a bowl, combine the crab meat, paprika, onion powder, mustard, mayonnaise and crushed crackers.
Stir to combine well, adding a touch more mayonnaise if needed.
Using a scoop, place some biscuit mix on your hand that has been dusted with flour; form a cup type of biscuit in your hand.
Take a scoop of the crab mix and place it in the bowl part of the biscuit.
Cover the biscuit with a little more biscuit dough. Continue until you have used all the dough.
Place each biscuit into a muffin tray. Bake for 12 to 15 minutes.
Brush with a mixture of melted butter and 1 tsp of lemon juice

You’re going to start by cooking your chicken breasts in the very same skillet you’ll use for the rest of the recipe. Just season them, brown them in some olive oil, and then braise them for a bit in some chicken broth until they’re cooked through. Then just set them aside for a bit while you start to work on the other components.
2 tablespoons olive oil
2 boneless skinless chicken breasts
2 1/2 cups chicken broth
1 1/2 cups heavy cream
1 teaspoon dried basil
1/2 teaspoon garlic powder
10 lasagna noodles
1 1/2 cups mozzarella cheese, grated
1/2 cup Parmesan cheese, freshly grated
2 cups baby spinach leaves
Kosher salt and freshly ground black pepper, to taste
Heat olive oil in a large skillet over medium heat.
Season chicken breasts and cook until one side is browned, 3-5 minutes.
Turn chicken, then add chicken broth to pan. Bring to a simmer, then cover and cook until chicken is cooked through, 10-15 minutes.
Remove chicken to a cutting board and set aside.
To skillet, add cream, basil, and garlic powder. Stir in lasagna noodles and bring to a simmer once more. Cover and cook until noodles are tender, about 15 minutes, stirring often.
While noodles cook, shred chicken. Once noodles are soft, stir in 1/2 cup of the mozzarella and parmesan, along with the shredded chicken and the spinach. Season to taste with salt and pepper.
Stir to combine, then top with remaining mozzarella cheese. Cover skillet and remove from heat. Let rest 5 minutes to allow cheese to melt.
Enjoy !


Ingredients:
12 lasagna noodles
2 cups cooked chicken, shredded
2 cups ricotta cheese
2 cups shredded mozzarella cheese
1 cup grated Parmesan cheese
3 cups spinach, chopped
4 cups milk
1/2 cup all-purpose flour
1/2 cup butter
3 cloves garlic, minced
1 teaspoon dried basil
1 teaspoon dried oregano
Salt and pepper to taste
Fresh parsley, chopped (for garnish)
Directions:
Preheat your oven to 375°F (190°C). Grease a 9×13-inch baking dish.
Prep Time: 20 min. | Cooking Time: 45 min. | Total Time: 1 hr., 5 min.
Kcal: 420 kcal | Servings: 8 servings

Homemade fresh Vietnamese Spring Rolls are easy to make and perfect for summer gatherings or a light dinner tonight. You’ll love the Spring Roll dipping sauce options, including a traditional Vietnamese dipping sauce and a 2-ingredient peanut sauce that we also use for Shrimp Lettuce Wraps. Watch the video tutorial and see how easy it is to make Fresh Spring Rolls. […]


This Lemon Custard Cake is fantastic by itself, but for a complete dessert experience, try it with a dollop of whipped cream or a scoop of vanilla ice cream. Adding a handful of fresh berries brings a pop of color and a juicy complement to the tangy lemon. And for the adults, a hot cup of tea or a glass of sweet moscato elevates this dessert into a true celebration.
1 1/2 cups all-purpose flour
2 teaspoons baking powder
1/2 teaspoon salt
1 cup granulated sugar
2 tablespoons butter, softened
1/4 cup vegetable oil
3 large eggs, separated
1 teaspoon vanilla extract
2 teaspoons lemon zest
1/3 cup fresh lemon juice
1 1/4 cups whole milk
Powdered sugar for dusting
Preheat the oven to 350°F and grease an 8-inch cake pan. Lining it with parchment paper can make removal easier.
Sift flour, baking powder, and salt together.
In a large bowl, cream together sugar, butter, and oil until light and fluffy. Blend in egg yolks one at a time, then add vanilla extract and lemon zest.
Gradually mix in the dry ingredients, alternating with the lemon juice and milk, until smooth.
In a separate bowl, whip the egg whites until stiff peaks form. Gently fold into the batter.
Pour the batter into the prepared cake pan and smooth the top.
Bake for 40-45 minutes or until a toothpick inserted in the center comes out clean.
Let the cake cool before removing it from the pan, then cool completely on a wire rack.
Dust with powdered sugar before serving.
Variations & Tips:
Substitute lemon with orange for a different citrus twist.
For a dairy-free version, use almond or coconut milk and dairy-free butter.
Separate the mixtures and bake for less time for a more pronounced custard layer.
Store leftovers in the fridge in an airtight container.

And there it is—a delightful dessert that’s sure to bring joy and sweetness to your table. Enjoy your baking journey, and remember, every meal is an opportunity to create lasting memories with those you cherish!
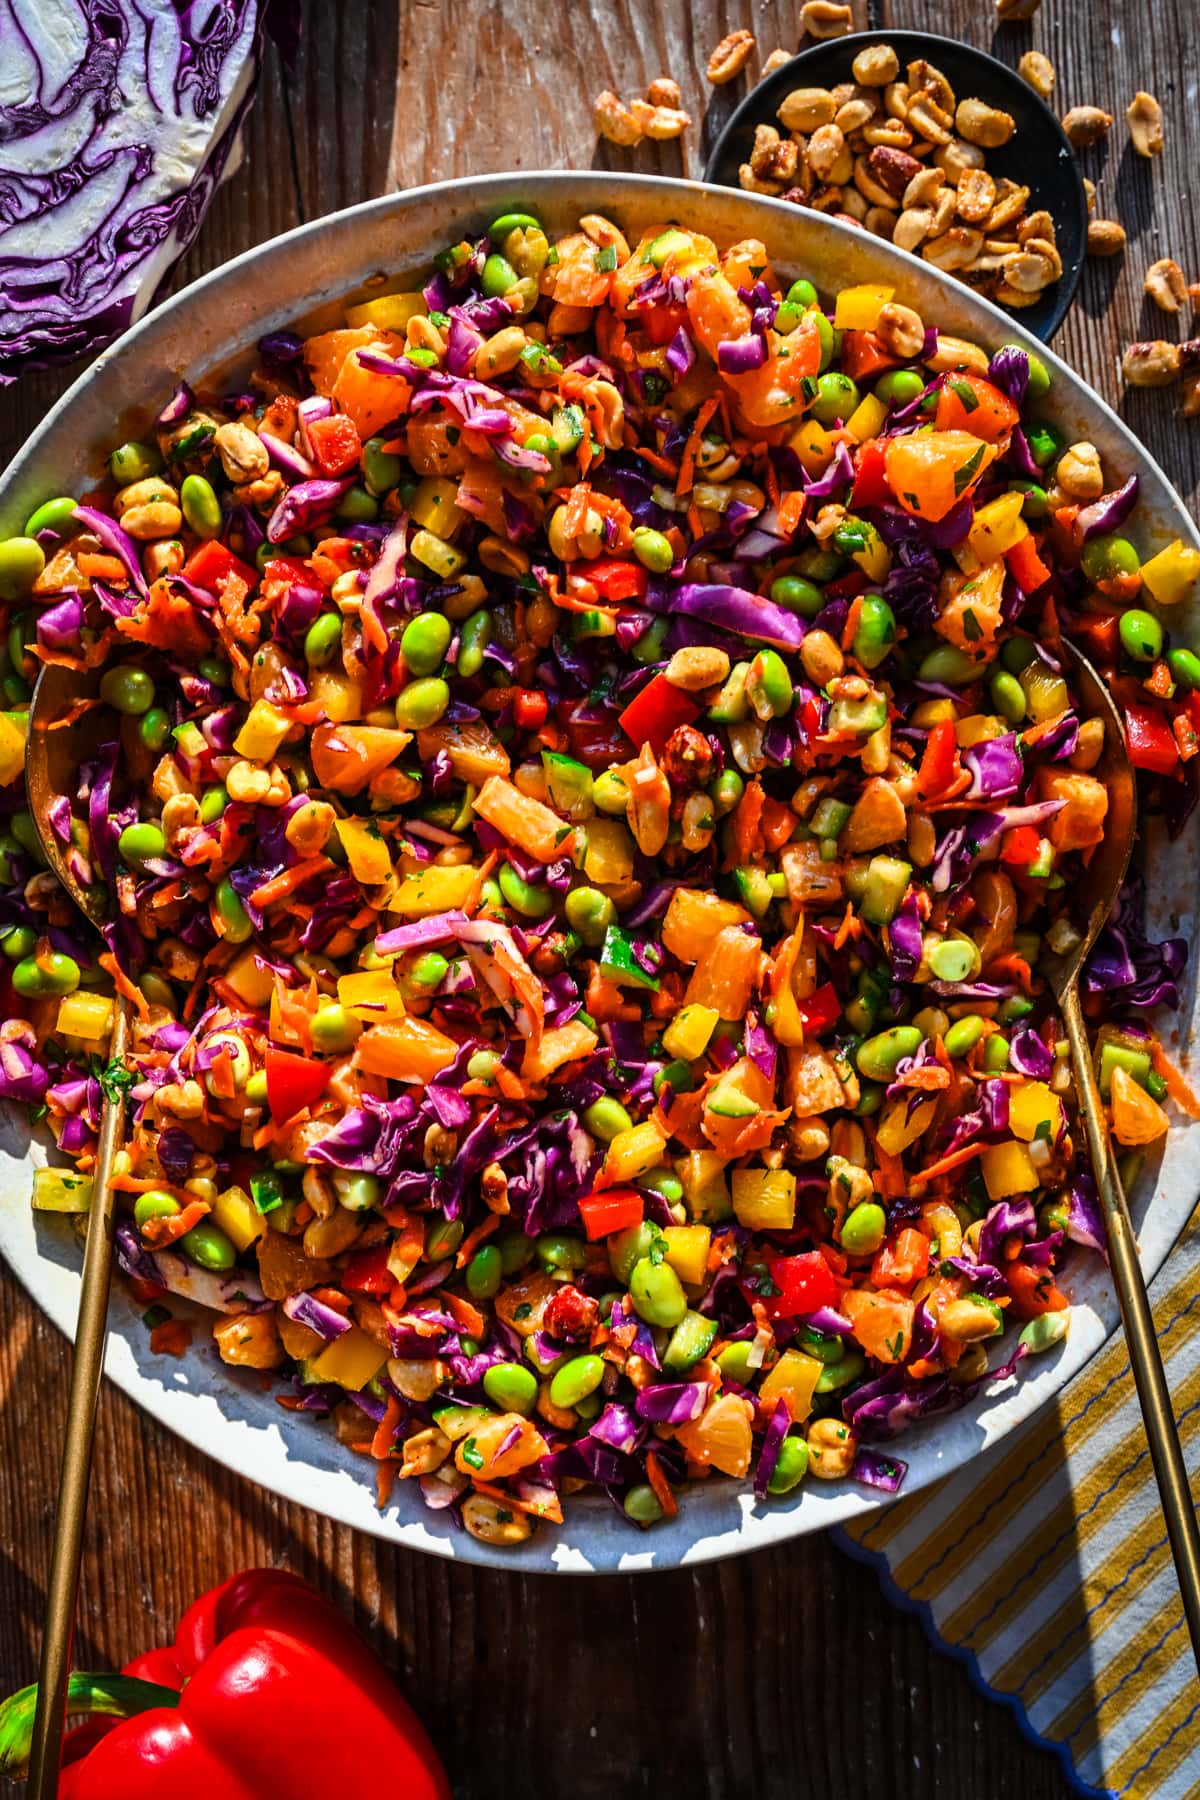
Colorful, crunchy, and packed with vegetables, this edamame crunch salad is a super fresh salad that’s easy to make and packed with nutrients. […]

This old-time chocolate cobbler is rich and wonderful! It’s great for potlucks and get-togethers. It’s fast, easy, and always a hit.
If you love molten lava cakes, then you are going to flip your wig over chocolate cobbler! Not only is it pretty much fail-proof, but it’s casual enough to serve after a weekday dinner and decadent enough for special occasions.

Source: Southern Chocolate Cobbler

– 4 large boneless, skinless chicken breasts
– 3 cups broccoli florets
– 1 1/2 cups shredded cheddar cheese
– 2 oz. cream cheese, at room temp
– 1 Tablespoon chopped fresh chives or other fresh herbs
– Garlic powder, cumin, or other spices
– 1/4 cup olive oil, divided
– Preheat the oven to 400°F.
– Place the broccoli in a microwave-safe bowl then add 2 tablespoons water. Cover the bowl (a large plate works best) then microwave the broccoli for 2 minutes.
– Remove the broccoli from the microwave and drain it very well on paper towels.
– Chop the broccoli into small, pea-sized pieces then add it back to the bowl.
– To the bowl, add the cheddar cheese, cream cheese, chives, 1/4 teaspoon salt, and 1/4 teaspoon pepper. Stir until well-combined.
Arrange the chicken breasts on a cutting board, and using a sharp knife, cut a deep pocket lengthwise into each chicken breast without cutting all the way through to the other side.
– Divide the broccoli mixture among the chicken breasts, pressing it firmly into each pocket.
– Season the outsides of the chicken breasts on both sides with garlic powder, salt, pepper, and any other preferred spices.
– Divide the olive oil among two ovenproof skillets set over medium heat. Once the oil is hot, add two chicken breasts to each pan.
– Sear the chicken for 3 minutes on one side then flip it once and sear an additional 2 to 3 minutes.
– Transfer the skillets to the oven and continue cooking the chicken breasts until the thickest part of each breast reaches 165°F, 10 to 15 minutes.
– Remove the chicken breasts from the oven and serve.
And Enjoy…!
Source. Baked Chicken

° 2 tbsp. olive oil
° 2 tbsp. brown sugar
° 2 tbsp. garlic powder
° 1 C. paprika
° 2 tbsp. onion powder
° 2 tbsp. chili powder
° ½ tsp. salt
° ¼ tsp. pepper
° 2 lbs. chicken wings, drumsticks and wings separated
° ½ cup Louisiana hot sauce
° ½ cup blue cheese dressing
Before you begin, clean all countertops and wash your hands with soap and warm water. Also remember to wash utensils and cutting boards as well as your hands after any contact with raw meat or eggs. Avoid cross-contamination by using a different plank for meat and other foods. Be sure to cook your food to safe temperatures and refrigerate leftovers within two hours. For more food safety tips, visit our home food safety section.
Steps
Preheat air fryer to 400°F (200°C). In a large bowl, combine the olive oil, brown sugar, garlic powder, paprika, onion powder, chili powder, salt and pepper. Add the chicken wings to the mixture and toss to coat them well.
Place the chicken wings in batches in the basket of the air fryer. Cook for 13 to 15 minutes, turning after 7 minutes, or until wings are tender and cooked through.
Toss the chicken wings with the hot sauce until well coated. Serve with blue cheese dressing.
Enjoy !

Have you tried Paula Deen’s Not Yo’ Mama’s Banana Pudding yet? NO?! Well, you HAVE to try it!
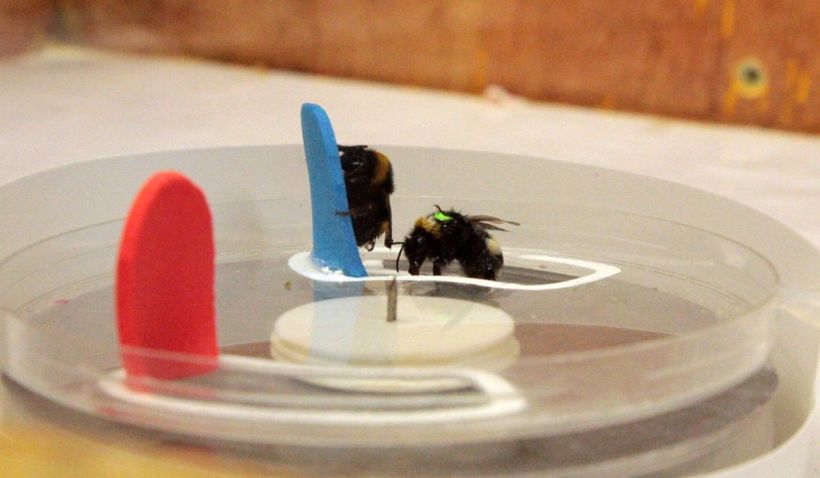
We’re not the only animals that can learn complex, problem-solving behaviours from each other – bumblebees can do it too. […]
Source: What’s this buzz about bees having culture? Inside a groundbreaking experiment | Aeon Videos

The next time you slice into a colorful papaya, don’t discard its tiny round seeds! Believe it or not, these little morsels are tasty, easy to prepare, and can add medicinal properties to practically any dish.[1] In this article, we’ll teach you how to eat, dry, and grind papaya seeds to improve your intestinal health and boost your daily dose of vitamins. So, what are you waiting for? Grab a spoon, and let’s get scooping! […]

What is sea moss and what are the benefits of eating it? Read on to the learn more about its uses, benefits, side effects, and more.
Sea moss is a type of sea algae that people may add to food or take as a nutritional supplement. Sea moss benefits may include supporting the immune system, thyroid function, and hair and skin health.
In this article, we will discuss the nutritional information of sea moss, how to prepare it, and any potential benefits and side effects. […]


This dish combines the warm, cinnamon-spiced comfort of apple pie with the novelty of being encased in a soft tortilla, all drizzled with a rich caramel sauce. It’s a perfect blend of traditional and unique, designed to impress both the young and the old at our family table. […]
Read on: Apple Pie Enchiladas
:max_bytes(150000):strip_icc():format(webp)/7514279-b275fb8b7bbf4b509c07bc839450753e.jpg)
Pie:
Topping:
Preheat the oven to 400 degrees F (200 degrees C).
Make the pie: Mix apples, brown sugar, white sugar, flour, and cinnamon together in a bowl. Pour into pie shell.
Make the topping: Mix flour, oats, and 2/3 cup plus 2 tablespoons brown sugar together in a bowl. Drizzle in melted butter and stir until crumbly. Scatter over pie.
Bake in the preheated oven until apples start to soften, about 15 minutes. Reduce the oven temperature to 350 degrees F (175 degrees C). Continue baking until apples are soft and topping is browned, about 40 minutes more.
Source: Apple Crisp Pie

Recipe from Daen’s Kitchen
:max_bytes(150000):strip_icc():format(webp)/8018-a18aeab732b04bc78a560ed47b6daeab.jpg)
Ube cake is a deliciously light Filipino cake made with purple yams and macapuno (coconut sport). Its vibrant purple color will look gorgeous on any dessert table!
Recipe: Ube cake
:max_bytes(150000):strip_icc():format(webp)/228240-BibimbapKoreanRiceWithMixedVegtables-ddmfs-4X3-0667-6033d57010ea4dd3bd7b95fb36d3dd51.jpg)
This bibimbap recipe makes a popular and delicious Korean meal. Meaning mixed rice, bibimbap is a delicious rice bowl topped with vegetables, beef, a whole egg, and gochujang (red chili pepper paste). Traditionally, bibimbap was eaten on the eve of the Lunar New Year, to use up any leftovers before the start of the new year.
Recipe: Bibimbap

To make it more soft in the middle I add water to the evaporated milk to make one cup. Same with the coconut milk. Add the vanilla at the end. I sometimes add thawed frozen grated casava when I make it for my aunties.
The bottom recipe is if you want chocolate mochi.
This is a savory dish full of exotic flavors that you would not like to miss trying. The ingredients include pork, pimentos, olives, onions, garlic and cilantro. It is good on a cold day or night and will warm your insides and leave you with a satisfied tummy. The video explains step by step how to make it so please try something out of your comfort zone.
It goes good with gandule (pigeon peas) rice.
If you’re in Oahu, Hawaii or Las Vegas, Nevada be sure to check out my PICKLE PASSION COOKBOOK in the library!
Visit my website to get complete ingredients and directions: https://hawaiispicklelady.com/
You can find this recipe under Pork.
Welcome to Jeff & Jo’s Puerto Rican Kitchen, where we share easy-to-make, authentic Puerto Rican recipes. With the Christmas season upon us, it’s time to show everyone how to make the quintessential Puerto Rican holiday dish, Pasteles. Don’t let anyone dissuade you by telling you how hard these are to make! We’re going to show you an easy recipe for pasteles, that you can make for your friends and family this Christmas.
Filling:
4 tbs vegetable oil
2 lbs cubed beef chuck (or pork shoulder or butt, if you prefer)
2 onions, chopped
6 cloves garlic, chopped
1/2 cup sofrito
1/2 cup tomato sauce
1/2 cup olives and pimentos
2 packets of sazon
1 tsp adobo
1 cup water
Achiote Oil:
1 cup vegetable oil
1/3 cup achiote seeds (aka annatto seeds)
2 bay leaves
2 cloves garlic
Dough:
3 lbs yautia
2 lbs green bananas
1 lb green plantains
1 cup of simmering liquid, reserved from your meat filling
4 tbs achiote oil
1.5 tsp salt
Check out our blog with ingredients and step-by-step here: https://www.jeffandjopr.com/post/trad…
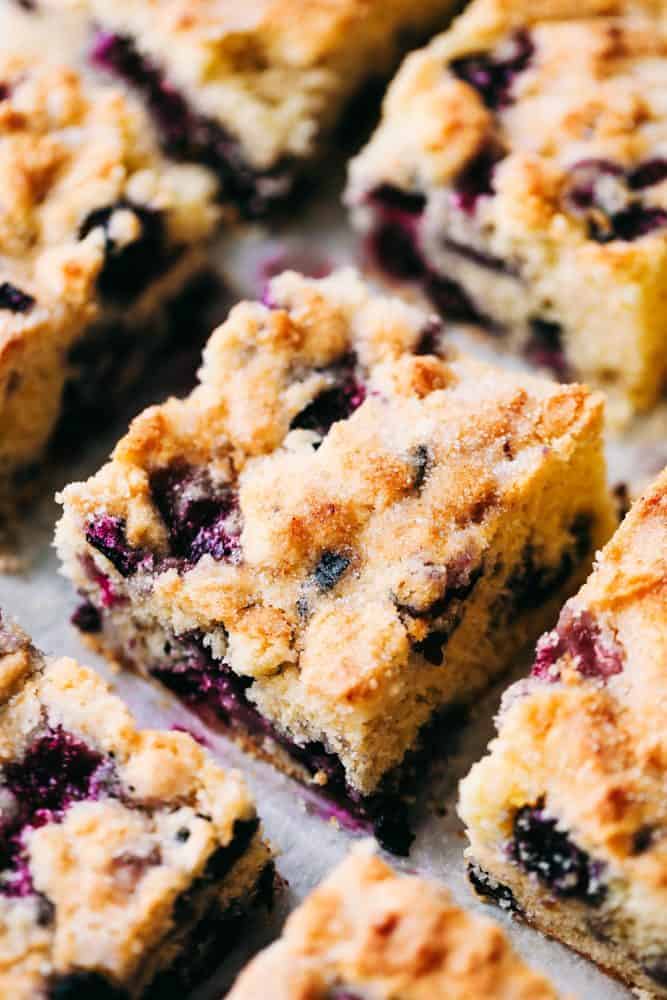
Blueberry buttermilk breakfast cake is so easy to throw together for breakfast. It is incredibly moist, buttery, and bursting with fresh blueberries inside. One piece is never enough! […]

How does coffee affect your brain and sleep if you consume it in the evening hours or shortly before going to bed?
Coffee is one of the most popular beverages in the country, with 7 in 10 Americans consuming the drink every week, according to the National Coffee Association.
While most people would probably associate coffee drinking with the daytime hours, some individuals consume the caffeinated beverage at night. This could lead to potentially negative effects when it comes to sleep quality, experts said. Caffeine is a compound found in coffee that stimulates the central nervous system. […]

A family recipe for our favorite blueberry lemon bread. No mixer required! Like most sweet loaves, it tastes best when allowed to sit for a day, wrapped in plastic wrap.
This Lemon Blueberry Bread recipe produces a perfectly moist, flavorful and delicious loaf of quick bread! Topped with a lemon glaze this easy bread recipe is a classic combination of tart, sweet, and bright flavors! Sure to be a new favorite! […]
Recipe: Lemon-Blueberry Bread

These delightful chocolate cherry cookies are the ultimate rich and decadent treat to add to your cookie jar.
Source: Chocolate Cherry Cookies

This Boston cream poke cake is a delicious cake filled with sweet vanilla cream pudding and topped with a rich chocolate ganache.
Source: Boston Cream Poke Cake

Keeping kratom consumers needs to be a critical concern for all elected officials in Michigan […]
Source: Opinion | Kratom has given me a better life. Michigan needs regulation | Bridge Michigan
 Haupia, also known as Hawaiian coconut pudding, is a sweet, cool, refreshing treat. This easy recipe only uses 4 ingredients and is perfect to share. […]
Find Your Magic
Tarot Readings, Inspiration, and Self-Empowerment
Making life on earth magick one moon phase at a time.
Astrologer ~ Mystic ~ Writer
of the Collegium Spiritus Sancti, a Golden Dawn Society
An affiliate of the Alpha et Omega Order of Melchizedek
All Knowledge Is Not Contained In Only One School
Connecting the grant community to #LearnGrants
Channelings & Articles
Magic Spell Books & Grimoires
Native Hawaiian Language Revitalization
Poetry & Tales of Love, Mystery, Magic and Spirituality
Organic Herbs, Herbals, Sustainable Gardening
Mother Nature: Feeding The Mind, Body & Soul, with Food, Medicine & Skincare.
"Inheritor of a Dying World, we call thee to the Living Beauty. Wanderer in the Wild Darkness, we call thee to the Gentle Light..."
Time is the most important thing we've been given
Embracing the Divine Within.
"...That I should bear witness to the truth." - John 18:37 // David E. Robinson, Publisher