Marta and Brock share a new recipe inspired by celebrity chef Tal Ronnen. This alternative to cheese takes a bit of patience to make but is well worth the wait! It’s healthy, creamy, and organic!
Tag: Food
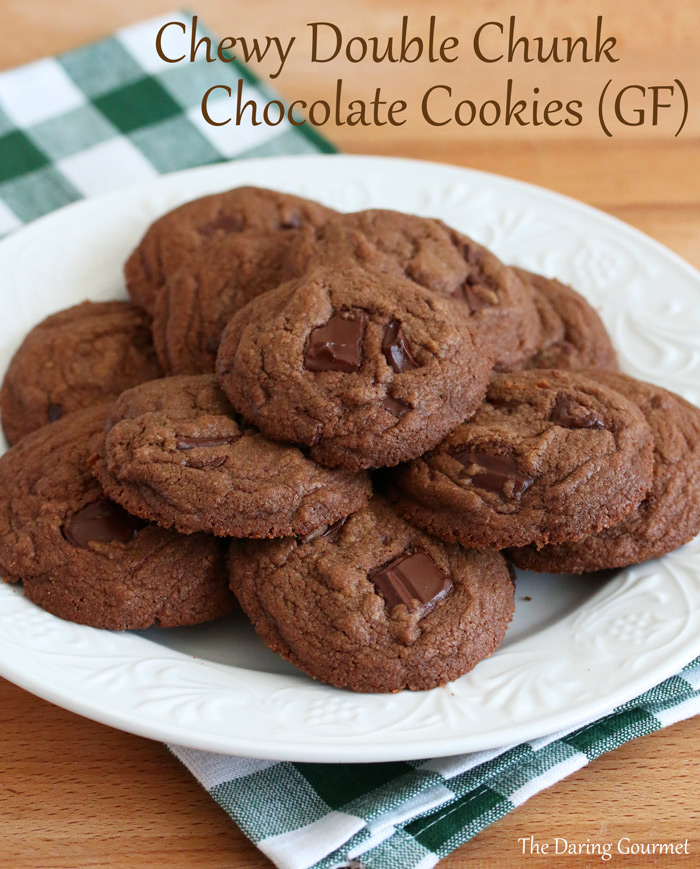
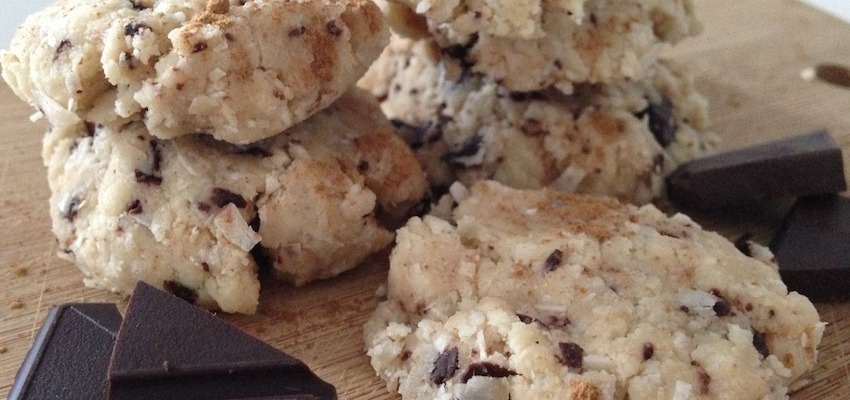
Recipe ~ Chewy Double-Chunk Chocolate Cookies (gluten-free)
Recipe ~ Brussels Sprouts with Balsamic Reduction

If you’re a Brussels sprouts lover, then this recipe is a must-try. A simple, elegant, delicious side dish.
If you’re a Brussels sprouts hater…sorry, it’s a hopeless cause and there’s no converting you. Why? It’s genetic. Yes, there’s actually a gene that explains your repulsion to all things cabbage. Read on.
In 2003 scientists located the exact gene responsible for this hatred toward Brussels sprouts. They decided to name it the “TAS2R38 gene” (they could have done better than that, surely.) It’s located on the 7th chromosome, has 1,143 bases, and it performs the role of coding for the PTC taste receptor. (All of this just further reinforces why I pursued an education as far away from math and chemistry as possible – although I did have to take some nasty statistics in grad school. Awful, awful stuff. Awful. But I’ve since recovered). So what on earth does all of that mean for non-geeks? It means this: There is a chemical called PTC (phenylthiocarbamide) that isn’t common in the human diet but is similar to chemicals found in the brassica family (cabbages and Brussels sprouts). If you happen to be the lucky/unlucky (I’ll let you determine which) possessor of the TAS2R38 gene, this gene produces a protein that interlocks with PTC and creates a strong, unpleasant taste sensation of bitterness.
Nope, there’s nothing you can do about it. You will forever hate Brussels sprouts unless you pay a ton of money to undergo hypnosis, which may not work anyway.
And if there are any kids or teenagers reading this (kudos for following a cook-from-scratch food blog!), you now have a slam-dunk excuse to give your mom or dad for not eating your sprouts. You’re welcome.
And now, for those of you who weren’t born with the TAS2R38 gene (my hand’s up), let’s get started!
Recipe ~ Hawai’ian Yam Cassarole

Want to break free from grandma’s marshmallow yam casserole? This Hawaiian Style recipe uses macadamia nuts and toasted coconut to add a little island flair to your sweet potatoes and brings the flavors of Hawaii to you dinner table on Thanksgiving. This recipe is also dairy-free and easy to make.
Ingredients:
4-6 yams
1/4 tsp salt
1/3 c coconut milk
2 eggs
1 tsp vanilla extract
½ tsp cinnamon
½ c brown sugar
Topping:
¼ c coconut oil
3 Tbls all-purpose flour
¾ c tightly packed brown sugar
½ c chopped macadamia nuts
½ c unsweetened shredded coconut
Directions:
1.) Preheat oven to 350 degrees. Lightly grease a 9×13 baking dish.
2.) Peel, then bake or steam the yams until soft. Mash in a large bowl and allow to cool.
3.) Add salt, coconut milk, eggs, vanilla, cinnamon, and sugar and stir into the yams. 4.)Transfer to the baking dish.
5.) In a medium bowl, mix coconut oil, flour, brown sugar, macadamia nuts and shredded coconut. Sprinkle over the yam mixture.
6.)Bake for 30 minutes or until topping is crisp and lightly browned.

Anthony’s Awesome Seafood Tacos
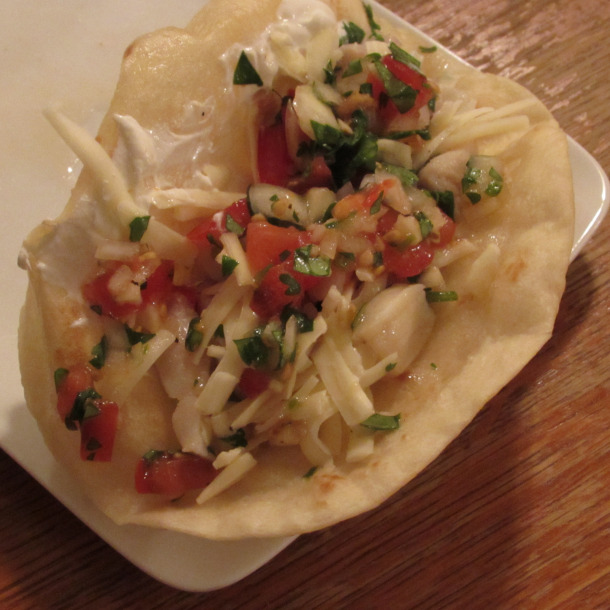
This recipe is a remake of the best fish tacos I’ve ever eaten. First cooked by our brother and fisherman extraordinaire, Anthony, this recipe may not be an exact replica, but it has been my go-to “fish taco” recipe for at least a dozen years now. The combination of scallops, shrimp and white fish paired with the lightly fried flour tortillas and minimal dressing makes for a really buttery, simple, satisfying flavor. One bite and you’ll be “hooked” too. And, on the off-chance you have leftovers, these ingredients make killer enchiladas!

ANTHONY’S AWESOME SEAFOOD TACOS
½ pound sea scallops, rinsed and drained
½ pound jumbo (21/25) shrimp, rinsed and drained
½ pound cod filet (I’m using rockfish today)
1 tablespoon finely diced garlic
½ teaspoon fresh ground cumin
½ teaspoon fresh ground coriander
zest and juice of one lime
2 tablespoons olive oil
1 tablespoon butter
¼ cup chopped fresh…
View original post 127 more words
Recipe ~ Gluten-Free and Sugar-Free Carob Snack Drops

Carob powder is commonly used as a substitute for cocoa powder. The powder is derived from grinding up the pods of carob trees. I know it sounds strange, but if you haven’t used carob powder before, your life is about to change. Why will it change your life? Because carob powder is sugar and gluten free! Now you can have chocolate tasting treats, without any of the negative components.
Serves 1
Ingredients
- 1 cup cashews
- 4 tablespoons carob-powder
- 1/2 cup coconut flower
- 2 teaspoons pine nuts
- 2 teaspoons xylitol (can be excluded)
- 1/4 cup water (or orange juice)
- 7 oz. dates
Preparation
1. Grind all the nuts using a food processor. Add the remaining ingredients into the processor and mix until a dough has formed.
2. Remove the dough and start to roll them into ball shapes. Feel free to roll the balls in any leftover (or extra) carob powder, coconut flour and ground nuts.
3. Store them between 2 cookie sheets in a snack tin of your choice. Refrigerate them and they can last for two weeks as well as letting the chill enhance the flavor.
Recipe ~ Gluten-Free Stuffing

Here is a yummy gluten free alternative to traditional Thanksgiving stuffing. Stuffing typically contains bread, a major no no for people who are gluten sensitive.
Not only that, this stuffing is also made from healthier ingredients, and even has a few things from the alkaline side of the alkaline diet chart.
You can modify this recipe any way you want to suite your dietary needs and taste buds. Try it out!
Ingredients
- Sweet potatoes, 2 medium or 1 large
- 1 onion, chopped
- 10 ounces of mushrooms, sliced
- 1/2 cup chopped celery (very alkalizing)
- Thyme, rosemary and sage
- 2 eggs
- 1 tbsp Apple cider vinegar
- 1/2 cup organic chicken broth
- 1 lb chicken sausage
- 1 tsp chopped garlic
- 3/4 cup walnuts
- 1/2 cup cranberries
Cooking Instructions
Set oven to 375, roast sliced sweet potatoes for 20-30 min, until nicely browned. In a medium low skillet, with a tad of olive oil, cook onion until caramelized. Simmer mushrooms in a separate pan.
Then mix mushrooms, eggs, walnuts , herbs, chicken broth, apple cider vinegar and cranberries.
Remove the sausage from the casing and cook in a pan on the stove top. Add the celery to the pan with the onions, near the end of cooking, so they don’t overcook.
Mix in the celery, onions and chicken sausage and mix it all together.
Finally, place it in as pie pan, in the oven for 10 minutes, or until all the the liquid has cooked away.
Recipe ~ Bok Tong Go dim sum ~ Sweet Rice Pudding Cakes

This recipe comes from the Golden Palace Seafood Restaurant on O’ahu, Hawai’i. Oh, how I love eating dim sum for breakfast, and especially my all-time favorite, Bok Tong Go, those slightly translucent, milky-white sweet rice cakes with the interesting texture. My brother, Jeff, and I grew up eating lots of these cakes while growing up in Hawai’i, Washington State and California. My parents were foodies, especially when it came to Chinese cuisine, and we learned our way around a Chinatown at an early age. In fact, the very first place we stopped in as we drove into San Francisco for the first time was the Golden Gate Bakery, where Mom and Dad bought a huge pink box full of beautifully steamed and baked treats. If you folks have never experienced a Chinese bakery or dim sum food, you’ve missed out big time and its definitely an experience for that bucket list.
Here’s the Bok Tong Go recipe from the Golden Palace … ah, I can still smell and taste these goodies as I write … wow. Enjoy!
Bok Tong Go
>> Step 1:
1/2 pound rice flour
1 cup water
Combine flour and water; cover with plastic wrap. Set aside at room temperature 3 days, until it smells slightly sour.
>> Step 2:
1 pound rice flour
1 cup cold water
1 cup sugar
2 cups hot water
Combine flour and cold water to form a claylike paste.
Dissolve sugar in hot water. Add paste to sugar water.
Stir fermented flour/water mixture from Step 1; add to Step 2 mixture. Mix well.
Remove 1/2 cup of this mixture and refrigerate (this becomes the starter for your next batch). Cover remaining mixture and set aside at room temperature 12 hours.
>> Step 3:
Vegetable oil to grease pan
1/2 teaspoon potassium carbonate and sodium bicarbonate solution
Prepare steamer: Bring water to a boil in a wok or large skillet. Place 12-inch steamer basket over wok. Grease 2 9-inch round cake pans (pie pans may be used, but this will give your rice cake a sloped side).
Add sodium bicarbonate to the fermented mixture. Pour mixture into pans. Place 1 pan into steamer for 30 minutes, then remove and steam second pan. Cool, remove from pans and slice.
=======
2018 Update: Due to several folks who complained that the above recipe didn’t work out so well for them, we have researched more and found the following alternative recipes for you to try.
Bok Tong Go
Alternative Recipe #1: This recipe uses Pandan leaves, which is a grass (like lemon grass) native to Asia. You can buy Pandan flavoring (which is green in color) at any Asian food store. It imparts a wonderful fragrant body to rice, especially when added to a pot of steamed rice during the cooking process.
https://theburningkitchen.com/bai-tang-gao-pak-tong-go-recipe/
Alternative Recipe #2: Here is another version of the recipe, without using Pandan.
http://mealsteps.com/recipe/sweet_rice_pudding_cake_(bok_tong_go)
Alternative Recipe #3: And a YouTube video to walk you through this recipe.
The article listing the full recipe shown in this video appears here.
http://yummyeasycooking.blogspot.co.uk/2014/02/how-to-make-steamed-rice-cake-bak-tong.html
Recipe ~ Dan Tat dim sum ~ Egg Custard Tart

I first encountered these treats as a little girl, when my parents always stopped by the local Chinese bakeries in Pearl City and later in Seattle … I was fortunate to grow up appreciating the myriad of taste experiences eating dim sum, or tea-lunch bites of yummy-ness. Nowadays, I consider myself a transplanted Northern Californian up here in Washington State. I spent the better part of 30 years hanging in the Oakland and San Francisco Chinatown areas of the San Francisco Bay Area. There is one treat at the Chinese bakery that is right up there with the perfect croissant found in any North Beach bakery: Dan-Tat, or Hong-Kong style egg custard tarts. Arguably, my favorite Chinese pastry, next to Bok Tong Go, or steamed rice pudding cakes. Period. And the best part is that today, I can make them at home.
Dan-Tat can be found in Hong Kong, Macau, and other parts of China. The Hong Kong and Macau versions differ slightly. Macau’s version was brought over by Portuguese colonizers, and they have more of a scorched, caramelized exterior. Dan-Tat eventually made its way to Hong Kong, where it was influenced by British custard tarts, which are a bit more glassy and smooth.
Ah, the sweet, sweet taste of colonial expansion.
You can buy them at Chinese bakeries, where you might be lucky enough to get a warm one. (Easy for me to do when I worked in the SF Financial District, just below Chinatown.) Don’t be the tourist when you’re visiting cities that have established Chinatowns … like Seattle, San Francisco, Oakland and Glendale/Los Angeles. If you want hot, fresh Dan-Tat, then go early in the morning when the bakeries just open and scoop up an entire pink box full … your co-workers will endear themselves to you for it.
But we don’t all have restaurants within reasonable traveling distance that offer good quality Dan-Tat, so it’s time to learn to make them from scratch like the best of ‘em. So gather round, padawans – a whole lot of awesome is about to come your way.
Ingredients
200g all purpose flour (1 ½ cups)
1/8 teaspoon salt
½ cup sugar, plus 1 tablespoon
200g unsalted butter, room temperature but not softened (14 tablespoons)
2 tablespoons cold water
scant 1 cup hot water
3 large eggs, at room temperature
1/2 cup evaporated milk, at room temperature
3/4 teaspoon vanilla
In a bowl, combine the flour, salt, and 1 tablespoon sugar. Add the butter and break it up roughly with your fingers, making sure to keep visible little chunks of butter in the dough. Add 2 tablespoons of cold water and bring the dough together. Add a tiny bit more water if necessary, but not too much. Cover the dough and refrigerate for 20 minutes.
Turn out the dough onto a lightly floured board, knead gently, and form into a neat rectangle. Roll the dough away from you (not back and forth), forming a 20 x 50cm rectangle (about 8×20 inches). Try to keep the edges even, and don’t overwork the butter streaks. Flecks of butter should still be visible in the dough.
Fold the top third of the dough down to the center, then the bottom third up and over that. Give the dough a quarter turn (left or right) and roll out again to three times the length. Fold the same way as before, cover, and chill for 30 minutes.
While the dough is resting, make the filling. Dissolve 1/2 cup sugar into the cup of hot water, and allow to cool to room temperature. Whisk eggs and evaporated milk together and then thoroughly whisk in the sugar water and vanilla. Strain through a very fine mesh strainer–this step is extremely important to getting a smooth, glassy egg tart.
Preheat oven to 400 degrees F/200 degrees C and position a rack in the lower third of your oven. Roll out the dough and cut circles to fit your tins (you can also use a shallow muffin pan). Press the dough into the tins and use a ladle to fill each tart shell until just reaching the edges of the outside crust. Once filled, immediately (but very carefully) transfer the pan to the oven and bake for 15 minutes. Reduce the temperature to 350 degrees F/180 degrees C and bake another 10-12 minutes, until filling is just set (if a toothpick can stand up in it, it’s done). If you see the shells start to puff up a bit, crack open the oven a little, and they should settle back down.
You can let the tarts cool for a couple minutes and enjoy them while they’re still hot.
Recipe ~ Reese’s Peanut Butter No-Bake Bars
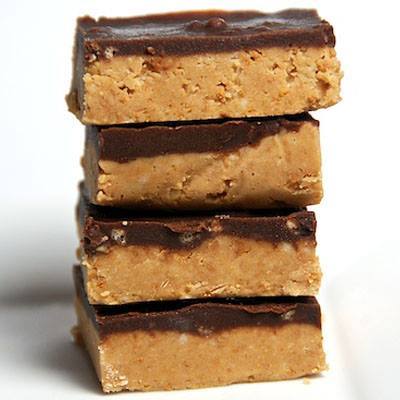
Ingredients
1 cup salted butter (melted)
2 cups graham cracker crumbs
1/4 cup brown sugar
1 3/4 cup powdered sugar
1 cup peanut butter
1/2 tsp. vanilla
1 (11 oz) bag milk chocolate chips
Instructions
1. Combine all ingredients, except chocolate chips in a medium sized bowl. Stir until the mixture is smooth and creamy.
2. Pour peanut butter mixture into a 9 x 13 pan.
3. Melt chocolate chips in the microwave (at 50% power) for 1-2 minutes. Stir chocolate and pour over the peanut butter mixture. Spread chocolate with a spatula. To even out chocolate, tap pan on the counter.
4. Refrigerate bars for one hour. Cut while bars are still cool. Enjoy
Thank you Jim Rose Circus
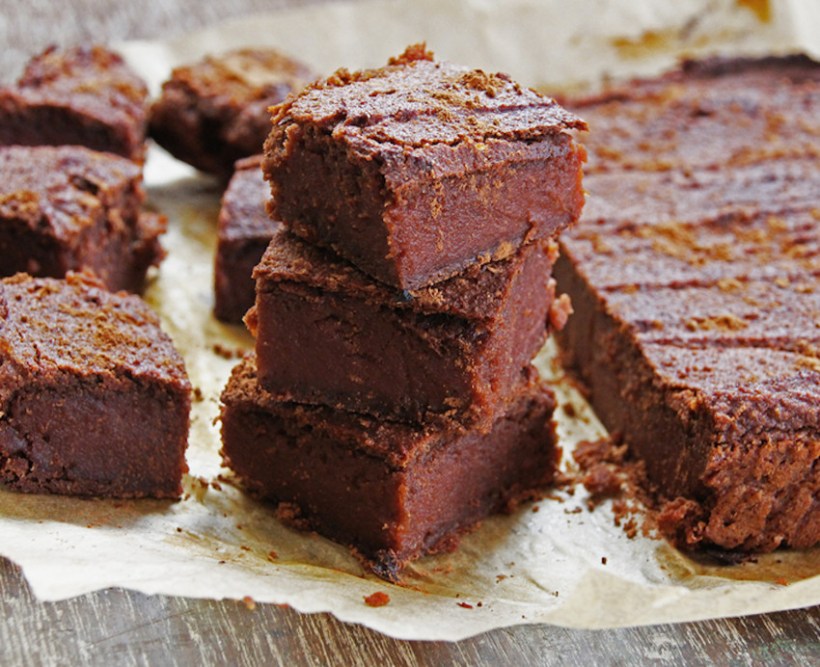
Recipe ~ Raw Vegan Pumpkin Pie Brownies
Fully Raw Pumpkin Pie Brownies! If you love pumpkin pie, you’ll love this twist on this delicious dessert!
Recipe ~ Red Velvet White Chocolate Brownies

ingredients:
1/2 cup butter – chopped
1 cup semi sweet chocolate chips –
3/4 cup sugar –
1/2 cup brown sugar –
1/2 teaspoon vanilla extract –
2 teaspoons red food coloring –
3 eggs –
1 1/2 cup flour –
1/4 teaspoon salt –
1/2 cup white chocolate – chopped, plus garnish
instructions:
preheat oven to 350 degrees. line a 9×9 inch baking pan with foil so the edges hang over the side. grease or spray lightly with cooking spray.
microwave the butter and chocolate chips in a microwave safe bowl in 30 seconds intervals, until just melted. remove from microwave and stir until melted. allow to cool for about 5 minutes. blend in the sugars, vanilla, red food color and eggs on at a time. dust in the flour and salt, mixing until just combined. fold in the white chocolate chips. spoon the batter into the prepared pan, spreading into an even layer.
bake until set, about 40 – 45 minutes or until a toothpick inserted comes out clean. remove from oven and let cool. using the aluminum foil handles hanging over the side, gently lift the brownies out of the pan. cut into squares and garnish with white chocolate curls.
Recipe ~ BLT (Bacon Leek and Sun-dried Tomato) Quiche

This savory is made with a polenta crust for a delicious variation on classic quiche. Click above for the recipe.
Recipe ~ Creamy Artichoke and Spinach Pasta
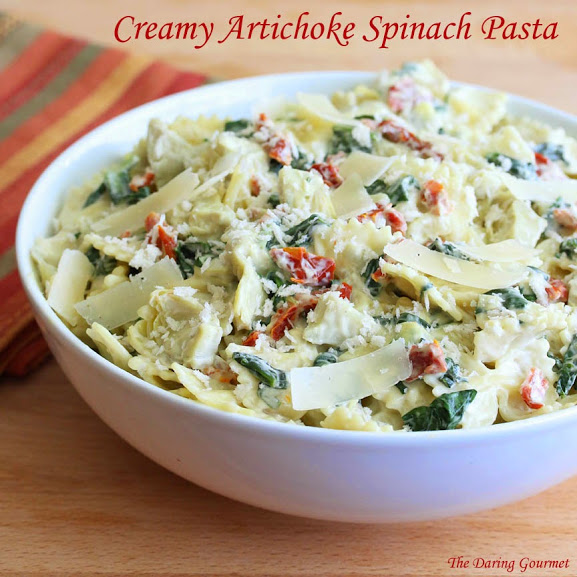
This creamy, cheesy artichoke spinach pasta is guaranteed to become a family favorite! Are you ready to add another favorite to your Vegetarian menu?
Recipe ~ French Almond Cake with Lemon Lavendar Glaze
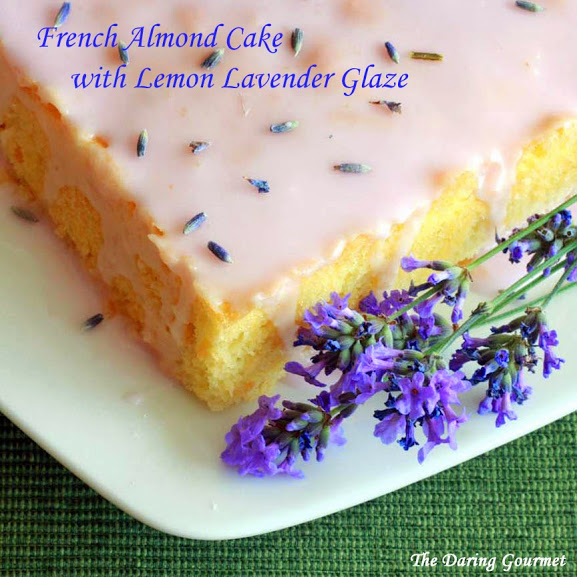
A delightfully graceful, delicious, yet simple and easy to make lavender cake. This cake is fit for the most elegant of tea rooms! Check this recipe out!

Easy Peasy Pomegranate Seed Removal
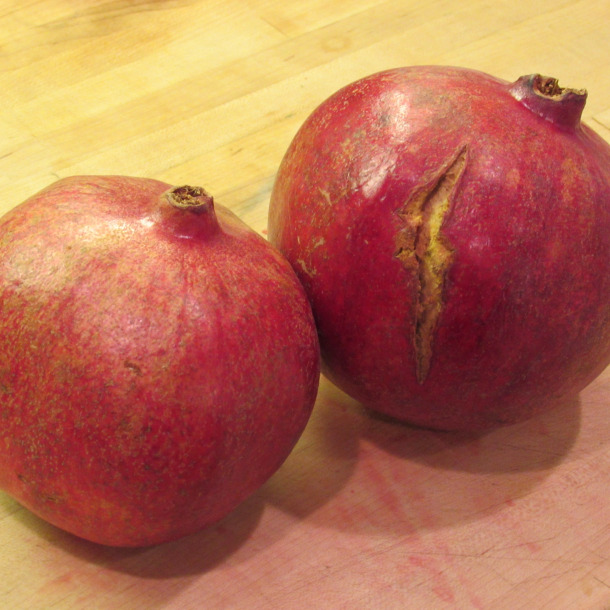
At a recent stop to a local fruit stand, I came across these gorgeous pomegranates for only $5 a bag. I had to jump at the bargain. As a neighbor saw me unloading the bags from my car she said “I love those but it’s too hard to get the seeds out.” The 8-year-old version of me would totally agree but I learned the easiest technique to deseed the crimson beauties – whacking!
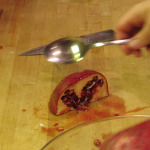
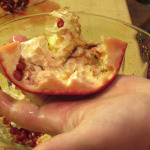

To deseed-simply cut the pomegranate in half or quarters. Over a large bowl, invert the section onto the palm of your hand and whack several times with the back of a large spoon or other utensil. Seeds fall right out. All clean!
Eat Well!
~Trish
Recipe ~ Shortbread flavored with Earl Grey Tea & Pistachios

Yield: 30 pieces
Preparation time: 20 minutes + 1 hour chilling time
Cooking time: 15 minutes
Main Ingredient: tea and pistachios
Ingredients:
115 gm butter, softened
40 gm. icing/confectioners sugar
150 gm. plain/all-purpose flour
1 tbsp finely ground good-quality Earl Grey tea leaves
½ tsp salt
1 tsp lemon zest (optional)
1 tsp vanilla
1/2 cup pistachios, chopped (you can substitute nuts of choice or omit completely for a plainer but still flavorsome cookie)
—
Instructions:
In the bowl of an electric mixer, beat the butter and icing sugar until pale and fluffy.
Add the flour, vanilla, ground tea leaves,salt and zest and combine
Blend in pistachios until just combined.
Wrap the dough in plastic wrap and chill for at least one hour.
Preheat the oven to 180°C fan bake. Line 2 baking sheets with baking paper.
Lightly flour a surface and roll out the dough to a ½ cm thickness. Using a cookie cutter of your choice, cut out as many cookies as possible.
Place on the baking sheets approximately 3 cm apart.
Bake for approximately 15 minutes until the bottoms are just golden.
Let the cookies cool and firm on the baking sheet for about 10 minutes before transferring to a cooling rack.
Store in a cool, dry place in an airtight container for up to a week.
Recipe ~ Coconut Shrimp Curry

Ingredients
4 large potatoes, peeled and cut into fours
1 large carrot, peeled and sliced
2 lbs shrimp, peeled, butterflied and deveined
1 large onion, cubed
1 1/2 tsp salt
1 can coconut milk
1/4 cup water
1 box S&B med-hot curry blocks
2 1/2 cups water
1 tsp cilantro, this is just a topping on top of your curry (optional)
Start to boil your carrots and potatoes in the 2 1/2 cups water, boil until fork goes half way through then lower heat to simmer.
While waiting for the vegetables to cook you’re going to start frying the onions in a separate pan with 1 tbsp oil until lightly brown in color. Now add in the curry blocks by crushing it between your fingers to make smaller pieces add in the 1/4 cup water and coconut milk and let it simmer for 5 minutes. This is just like making a coconut curry thickener for your curry.
Next step is to add the coconut mixture into the potatoes and carrots (leaving it in the water it’s already simmering in) stir together and cover.
Last step is to pan fry the shrimp until light orange in color and drain out any fluid that came out of the shrimp and add it straight into the curry. Simmer together for another 5-8 minutes before serving over hot rice.
Recipe ~ Baked Brocolli and Cauliflower Casserole
 Ingredients:
1/2 cup plain dry bread crumbs
1/4 cup plus 2 tablespoons grated Parmesan cheese, divided
2 tablespoons butter, melted
1 1/2 teaspoons Italian Seasoning, divided
1 package (16 ounces) frozen broccoli florets, thawed
1 package (16 ounces) frozen cauliflower florets, thawed
2 tablespoons butter
1 large onion, chopped (1 cup)
2 tablespoons flour
1 teaspoon Garlic Salt
1/4 teaspoon Black Pepper, Coarse Ground
1 1/4 cups milk
4 ounces (1/2 package) cream cheese, cubed
Directions:
Preheat oven to 350°F.
Mix bread crumbs, 2 tablespoons of the Parmesan cheese, 2 tablespoons melted butter and 1/2 teaspoon of the Italian seasoning in small bowl. Set aside. Cut up any large broccoli or cauliflower florets into bite-size pieces.
Melt 2 tablespoons butter in large skillet on medium heat. Add onion; cook and stir about 5 minutes or until tender. Stir in flour, remaining 1 teaspoon Italian seasoning, garlic salt and pepper.
Add milk; cook and stir until thickened and bubbly.
Add cream cheese and remaining 1/4 cup Parmesan cheese; cook and stir until cream cheese is melted. Add vegetables; toss gently to coat. Spoon into 2-quart baking dish. Sprinkle top evenly with crumb mixture.
Bake 40 minutes or until heated through and top is lightly browned.
Recipe ~ From the Big Island … ‘Ulu Cornbread (gluten-free)
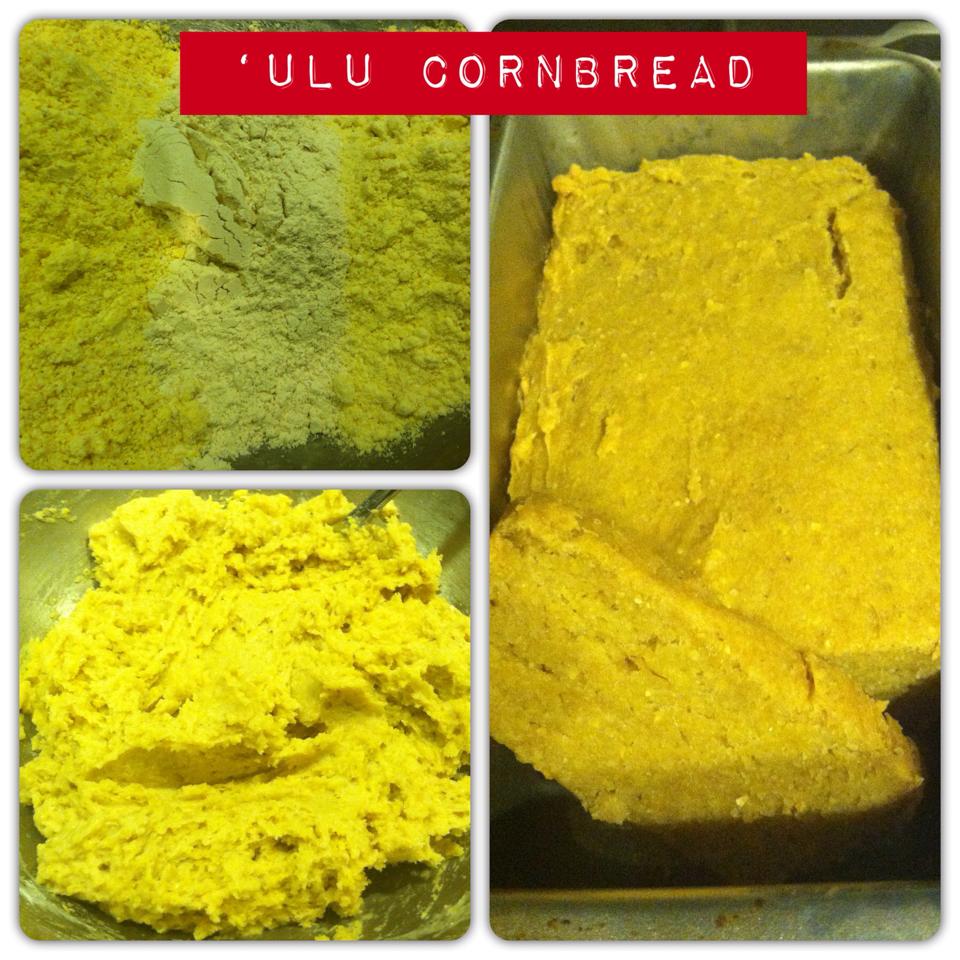
1 cup rice milk (or other plant milk)
1 tablespoon apple cider vinegar
¾ cup ʻulu (breadfruit) flour
½ cup cornmeal
½ cup corn flour
1 teaspoon baking soda
1 teaspoon baking powder
1 teaspoon salt
½ cup coconut oil, plus more for greasing pan
⅓ cup maple syrup
⅓ cup applesauce
2 teaspoons vanilla extract
Preheat the oven to 325.
Put the rice milk and the apple cider vinegar in a bowl and set aside.
Put the ʻulu flour, cornmeal, corn flour, baking powder, baking soda, and salt into a medium bowl and mix together.
Add the coconut oil, maple syrup, apple sauce, and vanilla extract to the bowl and combine.
Add the milk and vinegar mixture to the batter and combine.
Spoon the batter into greased loaf pan and smooth top.
Bake for 50 minutes.
ENJOY!
Recipe ~ Ella’s Sweet Potato Brownies
“Sweet potatoes are incredible: they’re bursting with nutritional goodness with all their antioxidants, and their anti-inflammatory properties, as well as being awesome blood sugar-regulators. Each cup contains an almost unrivaled amount of vitamin A, with more than four times your daily need of this antioxidant boosting vitamin, which is essential for strengthening your body’s immunity against infection.
Their bright color also doses you up on anti-inflammatories which have been shown to reduce inflammation on the brain and nerve tissue. Each serving also contains lots of wonderful fibre, which gives each brownies a ‘slow burning’ quality, meaning their energy is used up much more slowly than low-fibre carbohydrates – like normal brownies, so you’ll be fuller, more energized and more satisfied for way longer! So if you needed an excuse to eat brownies then here it is! They’re healthy!
Don’t forget that raw cacao is also a superfood as it is such an insanely rich source of antioxidants, one of the best in the world, as well as being packed with a number of other beneficial nutrients: manganese, which helps oxygenate the blood; magnesium, which helps maintain healthy bodily nerves, muscles and bones; and sulphur, which builds strong nails and hair, and promotes beautiful skin.” -Ella Woodward
Ingredients
Makes 10 brownies
- 2 medium to large sweet potatoes
- 2/3 of a cup of ground almonds
- 1/2 a cup of buckwheat flour (brown rice flour will also work)
- 14 medjool dates
- 4 tablespoons of raw cacao
- 3 tablespoons of pure maple syrup
- a pinch of salt
Preparation
1. Start by pre-heating the oven to 350ºF, then peel the sweet potatoes. Cut them into chunks and place into a steamer for about twenty minutes, until they become really soft.
2. Once they are perfectly soft and beginning to fall apart remove them and add them to a food processor with the pitted dates – this will form one of the sweetest, creamiest, most delicious mixes ever!
3. Put the remaining ingredients into a bowl, before mixing in the sweet potato date combination. Stir well.
4. Place into a lined baking dish and cook for about twenty minutes, until you can pierce the brownie cake with a fork bringing it out dry. Remove the tray and allow it to cool for about ten minutes – this is really important as it needs this time to stick together! Remove the brownies from the tray, leaving it another few minutes before cutting them into squares – then dig in and enjoy!
Source: Mind Body Green
Recipe ~ Chinese Orange Chicken
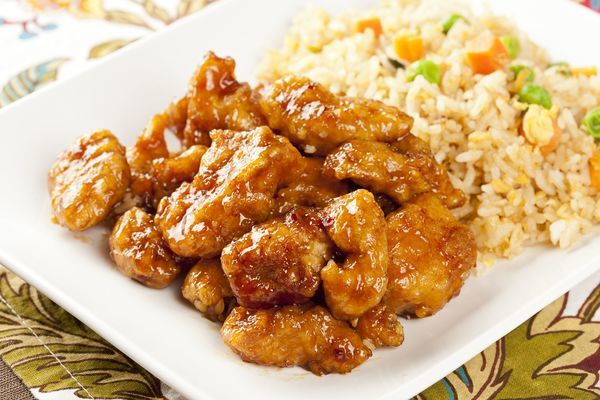 Orange Chicken; A good orange chicken should have just that little bit of sweetness and tangyness to it without being completely overpowering. It should also have that beautiful, slightly sticky gloss and marinade that perfectly coats the chicken. Most orange chicken recipes will have you fry the chicken first to get it nice and crispy, but if you want to make this dish healthier, skip the breading and the frying. Cook the chicken pieces in a skillet, then pour the sauce over and let the chicken and sauce boil until you get that perfect gloss. If you want to be even healthier, skip using chicken altogether and opt for Seitan vegetarian protein, which can be cut up like chicken and prepared per the recipe with the addition of vegetarian chicken boulion, or by adding Vegan “Chickin” pieces that you will find in your local grocery store’s frozen foods section under “healthy foods.”
Ingredients
MARINADE
- 1 cup chicken broth
- 1/2 cup freshly squeezed orange juice
- 1/2 cup honey
- 1/3 cup soy sauce
- 1/4 cup rice wine vinegar
- 3 cloves garlic, minced
- 1 tablespoon orange zest
- 1 teaspoon Sriracha (or to taste)
- 1/4 teaspoon ground or grated ginger
- 1/4 teaspoon white pepper
THE REST
- 1 1/2 lbs boneless chicken breasts cut into 1″ chunks
- 1 cup and 2 tablespoons cornstarch, divided
- 2 large eggs, beaten
- 1 cup vegetable oil
- 1/2 teaspoon sesame seeds
Directions
- Make the marinade: whisk together chicken broth, orange juice, honey, vinegar, soy sauce, garlic, orange zest, sriracha, ginger, and white pepper in a bowl.
- In a large zipper-lock bag or lage bowl, combine the chicken and 2/3 cup of the marinade. Marinate the chicken for at least 30 minutes, turning the bag occasionally. Drain the chicken from the marinade and discard the marinade.
- Heat the remaining mardinade in a medium saucepan over medium heat. Bring the marinade to a boil. Stir together 2 tablespoons of cornstarch with 2 tablespoons cold water, then stir that into the marinade. Cook, stirring frequently, until thickened (about 1-2 minutes. Keep warm.
- One at a time, dip the chicken into the beaten eggs, then dredge in the remaining 1 cup cornstarch, pressing in to coat.
- Heat the vegetable oil in a large saucepan. In batches, add the chicken and fry until golden brown and cooked through (about 1-2 minutes). Transfer to a paper towel-lined plate, then discard the excess oil. Serve the chicken immediately, tossed with the marinade and garnished with sesame seeds.
- Enjoy!
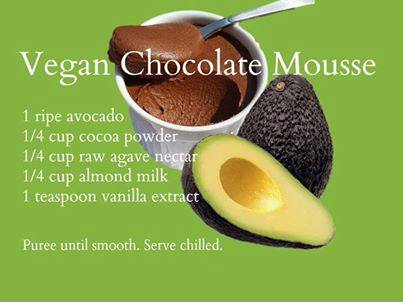
Recipe ~ Vegan Chocolate Mousse
Who said desserts can’t be healthy!?! This Vegan Chocolate Mousse is packed with superfoods, easy to make and completely satisfying when you have a craving for chocolate. For a fun twist, let it chill in the freezer for half an hour for a yummy frosty.
Recipe ~ Vegetarian French Onion Soup

Day 7 (final) ~ 7-day Desserts and Snacks Challenge ~ Bliss Balls

Bliss balls are taking the health food world by storm lately, and most health food nuts have their own special recipe. While you may pay a premium price for one of these in stores or at your local health food restaurant, making them at home will not only save you money but will also give you an opportunity to create your own unique flavour combinations.
This is a super basic recipe that lends itself well to experimentation. Try adding in fun things like chopped dried fruits, other nuts, different extracts, citrus zests or even switching up the nut butters! Play around and have fun 🙂
Raw Bliss Balls (Makes 4-6 balls – can be frozen for 3-4 months)
Ingredients:
- ½ cup raw nut butter of choice
- 2 tbsp coconut butter
- 2 tbsp dried shredded coconut
- 2 tbsp chopped hazel nuts
- 6 medjool dates, pitted and chopped
- 1 tsp vanilla powder or extract
- pinch sea salt
- any add ins you like – chocolate chips, dried cranberries, raisins, carob chips etc.
Directions:
1. Blend dates and nut butter in a food processor or blender until smooth.
2. Transfer date and nut butter mixture to a bowl. Add remaining ingredients and combine with your hands. Your mixture should now form balls. If it is too crumbly add more nut butter. If it is too loose add more shredded coconut.
3. Form into 1 inch balls. Refrigerate until set. Enjoy!
Recipe ~ Mushroom Biryani

I’ve made this dish several times and each time has been a fantastic taste experience. Sometimes I add seasoned tofu cubes, sometimes I don’t. But, what makes this dish is the vibrancy of the spices … this dish will leave you feeling warm and happy in the tummy. Enjoy!
Ingredients:
Basmati Rice – 250 gms, soaked for 15 minutes
Onion – 1, finely chopped
Button Mushrooms – 10, chopped
Tomatoes – 2, chopped (optional)
Mint Leaves – handful, chopped
Coriander Leaves – handful, chopped
Oil – 3 tsp
Ghee – 2 tsp
Salt as per taste
Grind together:
Saunf – 1 tsp
Cumin Seed s – 1 tsp
Ginger – 1/2 inch piece
Bay Leaf – 2
Garlic – 10 cloves
Cloves – 2
Black Peppercorns – 1/2 tsp
Red Chilli Powder – 1/2 tsp
Coriander Powder – 1 tsp
Coconut – 2 tsp, grated
Turmeric Powder – 1/4 tsp
Cardamoms – 2
Directions:
1. Heat a pan over medium flame.
2. Add ghee and oil.
3. Saute the onions till golden.
4. Add the ground paste, tomatoes, mushrooms, salt, mint leaves, coriander leaves and stir well.
5. Cook till the oil starts to separate.
6. Pour 2 cups of water and bring to a boil.
7. Add the soaked rice and cover with a lid.
8. Cook till the rice is done.
9. Remove from flame and mix well.
10. Transfer to a plate and serve hot with onion raita.
Day 6 ~ 7-day Desserts and Snacks Challenge ~ Orange Chocolate Fudge
 Have you ever had orange flavoured chocolate? I know that the combination may sounds a little strange at first, but trust me when I say that the bright, clean and crisp flavours of citrus really adds a special sparkle to the natural earthiness of chocolate.
These fudge squares are much easier to make than traditional fudge, and does not require a candy thermometer or precise temperatures. All you need to do is melt a little chocolate, blend a few other ingredients, mix and you’re good to go!
I know that the instructions tell you to wait until this glorious mixture is cooled and set before consuming, but if you are a little too impatient to wait for that, we will understand.
Orange Chocolate Fudge
Ingredients:
- 2 cups dry shredded coconut
- 2 cups vegan chocolate chips
- ¼ cup almond milk
- 1 orange, zested then peeled
- 2 cups Fresh dates, pitted and chopped
- ½ cup cocoa powder
- 1 tsp vanilla powder or extract
- 1 tsp cinnamon powder
- pinch sea salt
Directions:
1. Line 6×6 baking dish with parchment paper.
2. Place cocoa powder, salt, vanilla and cinnamon powder in a bowl and combine. Zest orange zest into cocoa powder mixture. Peel orange and discard the peel.
3. Place coconut in high speed blender and blend until a smooth butter forms. Add your peeled orange and dates. Continue to blend until well combined. Add to your cocoa powder mixture
4. Place a small pot with 1-2 inches of water over high heat. Place a glass or metal bowl over the pot, making sure that the water does not touch the bowl. Add chocolate chips and almond milk and melt chocolate until fully melted. Stir melted chocolate into coconut orange date mixture.
5. Mix well then transfer to lined baking dish. Place in freezer for a few hours. Slice and enjoy!
6. Makes 1 6×6 baking dish worth. Can be frozen for several months.
Recipe ~ No-Bake, Gluten-Free Chocolate Chip Cookies (Just 5 Ingredients!)
Raw cookies anyone?
This recipe is ridiculously simple and healthy. Your kids (and you) will love it.
No-Bake, Gluten-Free Chocolate Chip Cookies
Ingredients
- 1 cup coconut flakes
- 1.5 cups almond meal
- 4 tablespoons coconut oil, melted
- 2 squares of your favorite dark chocolate, diced in small chunks
- 1/2 teaspoon cinnamon
Preparation
1. Add almond meal, cinnamon and chocolate chunks into a mixing bowl.
2. Blend coconut flakes in a high speed blender until mealy, then add to the bowl with the almond meal mixture. Mix well with your hands or a spoon.
3. Add the melted coconut oil and mix with your hands until you get a slightly sticky texture. Then, using your hands, create four balls with your paste and carefully press them on a plate with your hand. Place in the fridge for a couple of hours to set.
NOTE: If you want these a bit sweeter, add a teaspoon of coconut sugar. Makes about 4 cookies.
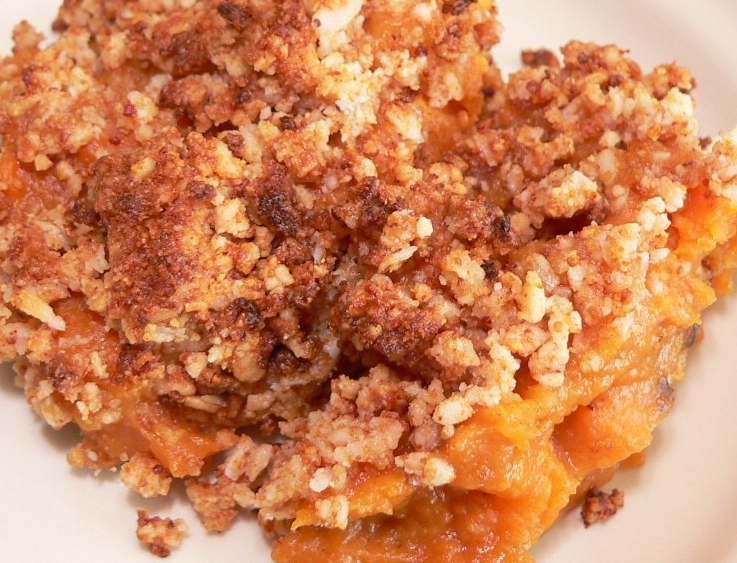
Day 5 ~ 7-day Desserts and Snack Challenge ~ Apple Crisp (4 servings)

Apple crisp was one of the first desserts I ever learned to make on my own when I was a little girl. I have fond memories of standing in my grandmothers kitchen in the summer time, chopping apples, mixing the butter into the oats and watching as my grandmother pull recipes together without ever touching a measuring cup.
As I grew up and began eating a healthier diet, I started to experiment with different ingredients in order to clean up the apple crisp my grandmother taught me to make. I found that apple crisp is one of the best desserts out there if you are in the mood to experiment, because it is not an exact science like baking is. Have fun with this basic recipe, adding in anything that you think would taste good to you and your family.
Apple Crisp
Ingredients:
- 3 apples, cored and chopped
- ½ cup rolled oats
- ½ cup dried shredded coconut
- ¼ cup chopped walnuts
- ½ cup almond butter
- ½ cup maple syrup
- 2 tsp cinnamon
- 1 tsp vanilla powder or extract
- pinch sea salt
Directions:
1. Preheat oven to 350 degrees. Line a 9×9 baking dish with parchment paper.
2. Toss diced apples with 1 tsp cinnamon and pinch of sea salt. Place in lined baking dish.
3. Combine remaining ingredients. Mix in a large bowl with your hands until a crumble forms. Place crumble on top of chopped apples in an even layer.
4. Bake for 30-40 minute or until apples are fully cooked and fork tender. Allow to cool and enjoy!
Autumn Recipe ~ Snickerdoodle Mini Cakes

INGREDIENTS
For the cake:
- 1 cup all-purpose flour
- 1 teaspoon baking powder
- 1/2 teaspoon baking soda
- 1 teaspoon mixed spice (combination of nutmeg, ginger, coriander, dill, cinnamon, cloves)
- 1/2 teaspoon salt
- 1/2 cup (8 tablespoons) unsalted butter, melted in the microwave (20 seconds at a time, until completely melted)
- 1/2 cup brown sugar
- 1 large egg
- 1 teaspoon vanilla extract
- 1/2 cup buttermilk
For the topping:
- 1/2 cup castor sugar
- 1 tablespoon cinnamon
DIRECTIONS
Preheat oven to 350 degrees (F). Line a muffin pan (I use silicone liners) and set aside.
In a large bowl, whisk together dry ingredients: flour, baking powder, baking soda, salt, and mixed spice. In a separate bowl, use an electric mixer to cream together melted butter and sugar until pale in color and fluffy.
Add egg and vanilla extract, beat to combine. Add the flour mixture, and beat until just combined. Don’t overbeat.
Lastly, add the buttermilk, and beat until just combined.
In a medium bowl, combine sugar and cinnamon for topping.
Fill the muffin liners to 2/3 full. Sprinkle the cinnamon and sugar over the tops evenly.
Bake for 18-22 minutes or until golden brown and a cake tester comes out clean.
Recipe ~ Miyoko’s Un-Turkey (Vegan, yeah!)
Watch Miyoko as she recreates for you her famous UnTurkey with gravy and stuffing. Holidays are coming … this recipe will come in handy. Enjoy!
This makes one very large UnTurkey, enough to feed 12 and still have leftovers for sandwiches and UnTurkey Noodle Soup.
Light Yeast Flavoring:
1 cup good tasting nutritional yeast flakes
1 Tbsp. salt
1/2 tsp. ginger
1/2 tsp. turmeric
1 tsp. black pepper
1 tsp. marjoram
1 tsp. tarragon
1 tsp. paprika
1 tsp. rosemary
2 tsp. sage
2 tsp. celery seed
2 tsp. thyme
2 tsp. garlic powder
2 tsp. onion powder
1 Tbsp. salt
1/2 tsp. ginger
1/2 tsp. turmeric
1 tsp. black pepper
1 tsp. marjoram
1 tsp. tarragon
1 tsp. paprika
1 tsp. rosemary
2 tsp. sage
2 tsp. celery seed
2 tsp. thyme
2 tsp. garlic powder
2 tsp. onion powder
Pulverize all ingredients in a blender until powdered. Store in a jar in a cool place.
For the UnTurkey:
6 cups water
1/3 cup soy sauce
½ cup Light Yeast Flavoring
8 cups vital wheat gluten
Traditional Dressing:
4 Tbsp. oil
1 large oni
1 large oni
on, chopped
2 stalks celery, chopped
2 carrots, diced
2 stalks celery, chopped
2 carrots, diced
1 lb. mixed mushrooms, sliced, tossed with oil and roasted in the oven
1 ½ lbs. Bread, cubed and dried in oven
1 Tbs. rubbed. sage
1 1/2 tsp. marjoram
1 1/2 tsp. Thyme
1 Tbs. rubbed. sage
1 1/2 tsp. marjoram
1 1/2 tsp. Thyme
1 tsp. Celery seed
1 tsp. salt
2 cups UnTurkey stock
1 tsp. salt
2 cups UnTurkey stock
Follow along with Miyoko with her step-by-step directions here: http://www.artisanveganlife.com/will-the-real-unturkey-please-stand-up/
Day 4 ~ 7-Day Dessert and Snack Challenge ~ Simple Raw Apricot Crumble

Baking can be fun, but sometimes you just want a simple dessert that comes together quickly and does not require that you heat up the whole house by turning the oven on. If you are in a warmer climate or it is still summer weather where you are right now, I have a feeling you are going to really enjoy todays recipe.
This crumble takes advantage of the natural sweetness of dates and fresh apricots or peaches to create a stunning dessert that will take you less time to make than it would for you to preheat your oven. You can also use peaches, plums, pears, nectarines or even thinly sliced apples in this recipe if you do not have access to fresh apricots. Get creative and have fun with this one!
Ingredients:
- 1 ½ cup Fresh dates, pitted and chopped
- 1 cup walnuts
- 4 tbsp dried shredded coconut
- 4 tbsp maple syrup
- 7-8 apricots, pitted and diced or 2-3 large peaches
- 1 tsp vanilla powder or extract
- 2 tsp cinnamon powder
- pinch sea salt
Directions:
1. Place ½ cup dates, 2 tbsp maple syrup, ½ tsp vanilla, 1 tsp cinnamon, 1 pinch salt and 1 apricot in a blender and blend until smooth. Pour mixture over remaining chopped apricots, toss and set aside.
2. Place walnuts in a blender or food processor and pulse a few times to chop. Add your remaining dates and pulse until a sticky mixture forms.
3. Remove date walnut mixture from blender or food processor and place in a bowl. Add coconut, remaining maple syrup, remaining vanilla, remaining cinnamon and a pinch of salt. Combine with your hands.
4. Crumble date walnut mixture over apricot mixture. Refrigerate for 1-2 hours. Enjoy!
5. Makes 4-6 portions – can be frozen for 1-2 months if well sealed.
Autumn Recipe ~ Banana Chai Smoothie
Ingredients:
2 fresh or frozen bananas
1 cup coconut milk
2 medjool dates, pitted
1/2 tsp cinnamon powder
1 inch piece fresh ginger
1/4 tsp cardamom powder
pinch clove powder
pinch allspice powder
pinch vanilla powder or extract
Directions:
Place all ingredients in a blender and blend until smooth.
Recipe ~ Maple Balsamic Quinoa Delight Salad
Quinoa is a nutritional powerhouse. Packed with fibre, carbohydrates, amino acids (the little structures that make up proteins), iron and b vitamins, this little pseudo grain is great if you are looking for a hit of usable energy.
It is much easier to digest and absorb than traditional grains like barley and wheat because it does not contain any gluten, and its chemical structure is much simpler. This salad is light, refreshing and tasty, but won’t leave you feeling hungry again within the hour.
Salad Ingredients:
½ cup dry quinoa
1 cup water
½ small beet, shredded
1 small carrot, shredded
½ small cucumber, sliced or diced
2 cups spring mix
Dressing Ingredients:
2 tbsp balsamic vinegar
1 tbsp maple syrup
1 tsp coconut oil
½ tsp mustard
pinch Himalayan salt
pinch pepper
Directions:
Place water in a pot over high heat. Bring to a boil. Add your quinoa and reduce heat to medium low. Cook until quinoa has absorbed water. Allow to cool. Combine cooled quinoa and remaining salad ingredients in a bowl or on a plate and set aside. Combine dressing ingredients in a personal blender or high speed blender and blend until smooth. You can also simply whisk dressing ingredients with a fork into a small bowl. Pour dressing over salad, toss and enjoy!
*Note: It can save you a lot of time to make the quinoa the night before and store it in the fridge!
Day 3 ~ 7-Day Desserts and Snacks Challenge ~ Hot Fudge Sundae (Makes 1 serving)

Is there anything more decadent than a warm, chocolate sauce drizzled over cool, sweet, creamy ice cream? Today’s dessert is going to have you licking your bowl clean – and don’t worry, we won’t tell anyone.
The sauce for this recipe is super fudgy and will have you forgetting all about the sugar and chemical filled chocolate sauces of your past. And you may even discover that you enjoy the way banana ice cream makes you feel so much more than the way regular ice cream makes you feel, that you make it a permanent fixture in your life!
When I was first transitioning towards a whole food diet, I actually ate banana ice cream with a different sauce every night for about six months, and never got tired of it! I am sure that you are going to love it was much as I do.
Ingredients:
- 3 bananas – 2 frozen, 1 fresh
- 2 tbsp cacao or cocoa or carob powder
- 1 tbsp coconut or cacao butter
- 2 tbsp maple syrup
- pinch sea salt
- 1 tsp vanilla powder or extract
- 2 tbsp chopped nuts of choice
Directions:
1. Place two frozen bananas in a blender or food processor and blend until it reaches a creamy ice cream texture. Transfer to a bowl and allow to set in the freezer while you make fudge sauce.
2. Place cacao or cocoa or carob powder, coconut or cacao butter, maple syrup, salt and vanilla into a blender and blend until smooth. The friction from the blending should heat your sauce.
3. Slice your fresh banana in half the long way. Place in a dish. Scoop ice cream in between the sliced banana, top with your sauce and chopped nuts
