Recipe ~ Creamy Sun-Dried Tomato Almond Butter Pasta

Creamy Sun-Dried Tomato Almond Butter Pasta ~ by SimpleDish

PREP – 8 minutes
COOK – 15 minutes
YIELD – 6 servings

100% guilt-free, low-to-almost-no-fat, super good for you CREAMY pasta sauce.

Ingredients

1/2 cup packed sun-dried tomatoes*
1 cup vegetable broth
2 garlic cloves, minced
3 tbsp. almond butter or 1/2 cup almonds
1 tbsp. olive oil, optional**
3/4 tsp. sea salt
1/4 tsp. ground pepper
1 tbsp. nutritional yeast, optional
1/4 cup chopped fresh basil
1 lb. dried pasta, cooked to serve

Instructions

Place all ingredients except for basil and pasta in the jar of a high-speed blender. Purée until completely smooth. Add the basil and turn the blender on low just to distribute.
Toss as much sauce as desired with cooked pasta and a little of the starchy cooking water, if needed.

Serve!

Notes

*If using sun-dried tomatoes that are NOT packed in oil, then you will want to soak them in boiling water for at least 15 minutes. Do not boil them- soak them in the boiled water. Or you can heat the vegetable broth and soak them in that, and then use the vegetable broth in the sauce for the added flavor from the sun-dried tomato soaking liquid.

**You don’t need the extra tbsp. of oil if you used sun-dried tomatoes that are jarred in oil. You can omit it completely if you’d like, but the sauce will be less rich.


Day 2 ~ 7-Day Snack and Dessert Challenge ~ Toasted Coconut Truffles

choco truffles
Chocolate Toasted Coconut Truffles ~ If you want info about this challenge and the shopping list, click on the image.

In our world, you should be able to have your chocolate and have your health too! These toasted coconut chocolate truffles are just what the doctor ordered if you are looking for something dense and satisfying that won’t totally weigh you down.

You may also be pleasantly surprised how flavourful these truffles are even tough they only contain 5 simple everyday ingredients. Enjoy these with a nice cup of tea at the end of your day, or as a pick me up snack during your day, or both!

Ingredients:

  • 3 cups dried shredded coconut
  • 3 cups Fresh dates, pitted and chopped
  • ½ tbsp coconut oil
  • pinch sea salt
  • cacao or cocoa or carob powder to coat

Directions:

1. Preheat oven to 350 degrees. Line a baking tray with parchment paper. Place coconut in an even layer on baking tray and bake for 10-15 minutes or until coconut is brown and toasted. Be sure to watch it as it can go from brown to black in a very short time!

2. Remove coconut from the oven and transfer to a high speed blender or food processor. Blend with coconut oil until a smooth butter forms.

3. Add pitted chopped Fresh dates and process again until thick mixture forms. It is OK if the dates don’t get full blended in, having a few date pieces in your truffles can be tasty!

4. Remove mixture from blender and let cool in the fridge for 15 minutes.

5. Roll your mixture into 1 inch balls and coat in cacao, cocoa or carob powder.

6. Place on lined baking tray and cool in the freezer or enjoy as they are!

Recipe ~ Homemade Guava Jam

guava jam2Here is the recipe for homemade GUAVA JAM:

Cut ends of Guavas and cut in half.
Place in pot and cover with water.
Bring to a boil and cook for about half an hour until
it is soft. Strain the juice in a sieve. Keep juice separated.
Press pulp thru a sieve, until only seeds remain.
Discard seeds.

guavas

Measure pulp. I used 6 cups to 6 cups of sugar and place in a pot.
Bring to a boil (being careful not to burn yourself.) Stir constantly,
continue cooking til thickens about half an hour.

guava jam


Have canning jars ready.  Place 1 block of butter into jam, stir till combined, then pour into jars, place lids and caps on.  ALL PAU (that means “it’s finished, the end”).

Give with ALOHA.

**P.S.:   Guava Jam is the key to my very tasty Baked Guava Ham.  And, with a couple loaves of homemade bread?  Heaven.

Recipe ~ Easy Chicken Gyros & Tzatziki Sauce

Click on image for recipe details.
Ingredients
  • 4 chicken breasts, pounded to ½ inch thickness
  • 1 tablespoon mediterranean seasoning (you can substitute Italian seasoning in a pinch)
  • 1 red pepper, thinly sliced
  • ½ red onion, thinly sliced
  • 4 pitas (this is a Greek-style flatbread you can find at almost any grocery store near the bread and tortillas or in the bakery)
  • optional: lettuce, feta cheese crumbles
Tzatziki sauce
  • ½ English cucumber, peeled and diced
  • 2 cups cold plain Greek yogurt
  • 4 teaspoons minced garlic
  • ⅓ cup chopped dill, fresh or frozen (may sub 2 tablespoons dried dill)
  • 1½ Tbsp freshly squeezed lemon juice (juice of ½ medium lemon)
  • ½ tsp salt, or to taste
  • ⅛ tsp black pepper
 
Instructions
  1. Puree all sauce ingredients in a blender or food processor. Cover and chill until ready to serve. (If you have time, make this a few hours in advance or the night before so that the flavors can marinate)
  2. Season chicken breasts with mediterranean seasoning. Cook in a large skillet or pan over medium heat 5-6 minutes on each side until cooked through. Cut into strips.
  3. Lay pitas on a clean surface. Add lettuce (if desired, chicken, red pepper strips, and onions. Top with tzatziki sauce and feta (if desired). Fold pita over like a sandwich, or roll it into a “tunnel shape”.

For Monday, September 29, 2014 ~ 7-DAY DESERT AND SNACK CHALLENGE ~ DAY 1

Tropical fruit ice cream with no white sugar!
Tropical fruit ice cream ~ Click image to access the shopping list and description of this 7-day snacks and desserts challenge

Ingredients:

1 frozen banana
1 cup frozen mango
½ cup coconut milk
1 tsp vanilla powder or extract
1 tbsp maple syrup (optional)


Directions:

Place all ingredients in a blender or food processor and process until smooth.  Enjoy!

Makes 1 serving


Recipe ~ Filipino Champorado (Chocolate Rice Pudding)


Champorado (Filipino Chocolate Rice Pudding)
Champorado ~ Total Time: 30 mins | Makes: 6 servings
Champorado, also called chocolate rice, is versatile. Jun Belen, an Oakland, California–based cook and food photographer, grew up eating it for breakfast on chilly winter mornings in Manila, with pan de sal (soft, buttery rolls) and fried salt fish. He also ate it chilled as an after-school snack with evaporated milk poured over the top. We prefer our champorado made with good-quality bittersweet chocolate and served warm as a luxurious ending to a meal.

What to buy: Since this recipe contains so few ingredients, be sure to use good-quality chocolate. Missouri-based bean-to-bar company Askinosie imports single-origin cacao from Davao in the southern Philippines and produces a 77-percent bittersweet chocolate with earthy and slightly smoky flavors that really shine through in this simple recipe.

Although rice does not contain any gluten, short-grain sweet rice is sometimes labeled as glutinous rice or sticky rice and can be found in the Asian aisle of most grocery stores.

Game plan: The liberal garnish of rich evaporated milk is traditional, but feel free to substitute regular whole milk or half-and-half.


INGREDIENTS
  • 6 ounces bittersweet chocolate, coarsely chopped
  • 1 cup short-grain sweet rice, also known as sticky rice
  • 5 cups water
  • 1/3 cup granulated sugar
  • 3/4 cup evaporated milk


INSTRUCTIONS

  1. Create a double boiler by filling a pot with 2 inches of water and bringing it to a simmer over medium-low heat. Place the chocolate in a heatproof bowl and set it over the pot. (Do not let the water touch the bottom of the bowl.) Stir continuously until the chocolate is completely melted and smooth. Remove from the heat and set aside.
  2. Place the rice in a fine-mesh strainer and rinse it under cold water until the water runs clear. Transfer the rice to a medium saucepan, add the measured water, and bring to a boil over medium heat. Reduce the heat to low and simmer, stirring occasionally, until the rice is tender and the mixture thickens, about 15 minutes.
  3. Add the sugar and melted chocolate to the rice, whisk to combine, and return to a simmer. Continue to simmer, stirring occasionally, until the sugar has dissolved, about 2 to 3 minutes. Remove from the heat and set aside until the pudding has cooled slightly but is still warm, about 45 minutes. (At this point, you can cool the champorado completely, transfer it to a container, cover, and refrigerate for up to 3 days.)
  4. Spoon the champorado into serving bowls and drizzle each with evaporated milk.

Recipe ~ Pumpkin Cream Cheese Crunch Cake

Pumpkin-Cream-Cheese-Crunch-Cake-QL.jpg.pagespeed.ic.2hkEIGMXjC
Prep Time: 15 minutes
Cook Time: 35 minutes
Total Time: 50 minutes

Ingredients:

1 (16.5-ounce) boxed spice cake mix
1 (15-ounce) can plain pumpkin (not pumpkin pie filling)
1/2 cup vegetable oil
1/2 cup water
3 eggs
1 (8-ounce) block cream cheese, softened
4 tablespoons powdered sugar
2 tablespoons lemon juice
1 cups chopped pecans
1/3 cup lightly packed brown sugar
1/2 teaspoon ground cinnamon

Instructions:

Preheat the oven to 350° F and lightly spray a 9X13 baking dish (or pan) with nonstick cooking spray.

Combine the cake mix, pumpkin, oil, water, and eggs in a large bowl and mix until well combined, about 2 minutes.

In another bowl, combine the softened cream cheese, powdered sugar, and lemon juice. Stir until mixed, adding more lemon juice if necessary to get the mixture smooth and just pourable.

Pour half of the cake batter into the baking pan and then drop dollops of the cream cheese mixture on top. Gently spread the cream cheese mixture as much as possible, but don’t stress over getting it perfect. Top with the remaining cake batter and spread evenly.

Mix the chopped pecans, brown sugar, and cinnamon together in another bowl and sprinkle over the top of the batter. Bake for 35 to 40 minutes or until the cake is set. Cool before slicing.


Recipe ~ Meatless Meatballs

meatballs

Prep Time: 30 Minutes
Cook Time: 1 Hour
Ready In: 5 Hours 30 Minutes
Servings: 8
“Make vegetarian meatballs with browned mushrooms instead of meat and you’ll be amazed by their hearty taste and perfect texture. Approved for use on spaghetti!”
 
Ingredients:
2 tablespoons olive oil
2 lbs fresh white mushrooms, finely chopped
2 pinches salt
2 tablespoons butter
1 cup finely chopped onion
8 cloves garlic, minced
1 cup quick-cooking oats
2 ounces very finely shredded
Parmigiano-Reggiano cheese
1 cup bread crumbs
1/2 cup chopped flat-leaf (Italian) parsley,
packed
4 eggs, divided
2 teaspoons salt
freshly ground black pepper to taste
2 pinches cayenne pepper, or to taste
2 pinches dried oregano
6 cups pasta sauce
2 tablespoons very finely shredded
Parmigiano-Reggiano cheese, or to taste
2 tablespoons chopped flat-leaf (Italian)
parsley, or to taste
Directions:
This recipe’s ingredients is scaled to yield a servings amount of (8). The directions below still refer to the original recipe yield of (4).
1. Heat olive oil in a skillet over medium-high heat. Add mushrooms to the hot oil, sprinkle with salt, and cook and stir until liquid from mushrooms has evaporated. Stir butter into mushrooms, reduce heat to medium, and cook and stir mushrooms until golden brown, about 5 minutes.


2. Stir onion into mushrooms and cook, stirring often, until onion is translucent, 5 minutes. Remove skillet from heat and stir garlic into mushroom mixture until fragrant, about 1 minute. Transfer mixture to a mixing bowl.


3. Mix oats into mushroom mixture until thoroughly combined. Gently stir 1 ounce Parmigiano-Reggiano cheese into mixture. Add bread crumbs, 1/4 cup parsley, and 1 egg; season with salt, black pepper, cayenne pepper, and oregano. Mix together with a fork until crumbly. Stir in remaining 1 egg. Mixture should hold together when pressed.


4. Cover bowl with plastic wrap and refrigerate at least 4 hours. For best flavor and texture, refrigerate overnight.


Recipe ~ Samoan Panipopo Coconut Buns

panipopo bunsRecipe:  Samoan Panipopo Coconut Buns

A popular, yet misrepresented, recipe is of panipopo, or coconut buns. There are many recipes on the Internet using ready-made dough, which is not authentic. An authentic recipe can be found by Lei Ne’emia. As with many people who “eyeball” in their cooking, Ms. Ne’emia’s recipe is similarly written. Here is a shortened version that hopefully will give similar results.

Pani Ingredients:
8 c flour
1/2 tsp salt
1/4 c butter, softened
1/4 c sugar (add more or less to preference)
1/4 c dry active yeast
2 c warm water

Pani Preparation:
In a large bowl, rub softened butter into flour and salt. Using of clean hands works best to create the silky, but not greasy, texture that is needed.

Make a well in the middle of the flour mixture. Pour the sugar in the middle.

In a smaller metal or glass bowl, dissolve yeast in really warm water. Avoid using plastic bowls for this recipe. Stir until the yeast is fully dissolved. Add more warm water if necessary. The yeast should be a milky gray color and smell like bread. Pour mixture into the well of sugar.

Using a wooden spoon, fold the ingredients together. Scrape from the sides of the bowl into the middle until everything is combined nicely. If necessary, add more warm water in to make the doughy consistency, but be sure it is really thick and sticky, like pancake batter.

Cover bowl with a damp dish towel and allow it to rise in a warm, dark place for one hour.

Now, the dough should have doubled in size and have holes in it. Spread flour onto a counter top or tabletop, a thick blanket of flour is good. Knead the dough working from the edges inward. Continue kneading flour to the mixture until it can form into a ball. Do not knead too long or the buns will not be fluffy, but dense like bagels.

Cover the dough again and allow to rise another hour.

Preheat oven to 400 degrees F. Cut the dough into chunks a little larger than a golf ball. Roll each chunk into thick “strings”. Tie each string into a knot. Place about 24 knots in each large cake pan. About two and a half to three pans will be needed.

Popo Ingredients:
2 cans pe’epe’e (canned coconut cream)
1 c flour
water
sugar

Popo Preparation:
Fresh coconut cream is always best, but, when there are no coconut trees or coconut tree climbers to pick and crack open a coconut, it is okay to resort to canned coconut cream. A great coconut cream product is made by Kara.

Pour the coconut cream into a container.

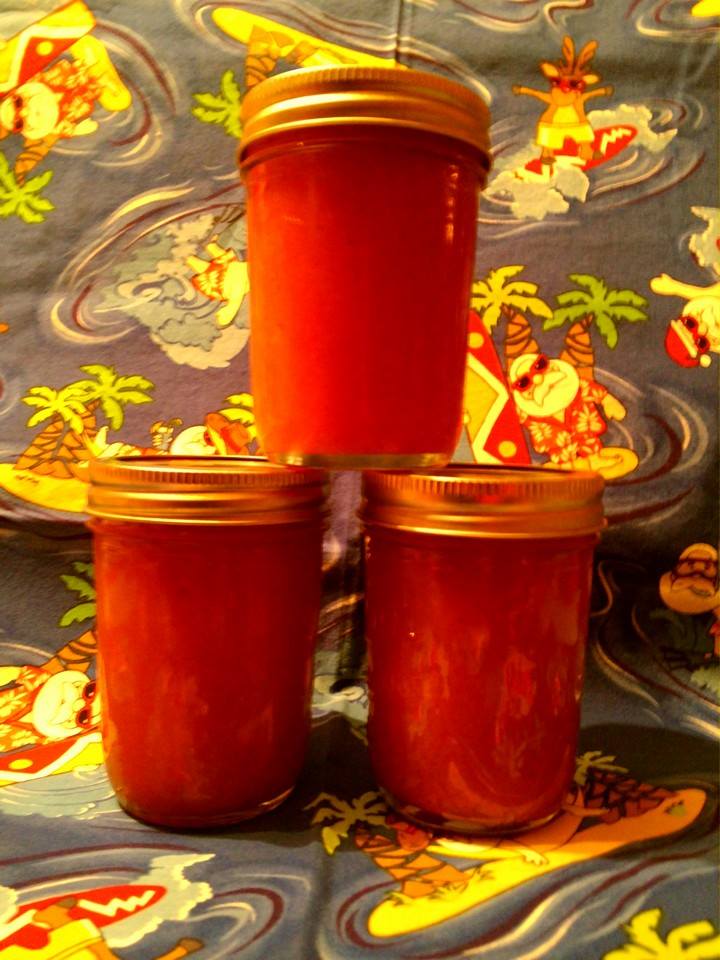
In a small bowl, mix together flour and water to make a runny paste. Pour into container. Top off with more water to be sure there’s enough for all the pans. This mixture should be able to fill all the pans and cover at least half of the height of the buns.

Before pouring the mixture onto the buns, it needs to be sweetened with enough sugar to be a bit sweeter than you think it should be.

Panipopo Preparation:
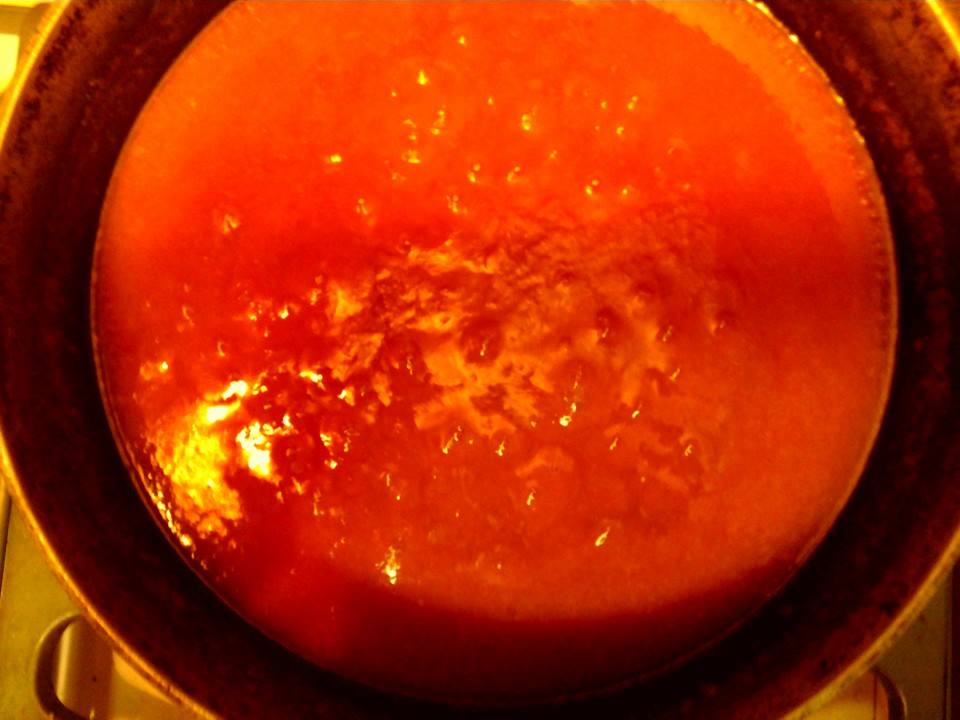
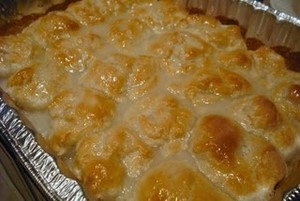
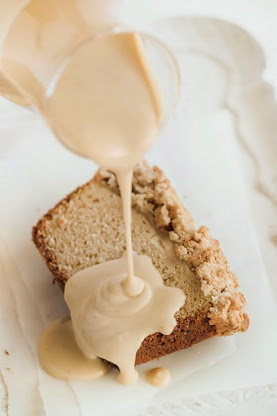
Pour the cream mixture onto the buns. Place the pans in the oven and bake for 20-30 minutes. Be sure to check the cream to be sure it is not too dry. It has to have a chance to boil and the tops of the buns to golden.

While the buns are cooling, be sure to top it off with sugar water to prevent the buns from getting dry. Cover with foil or a damp cloth should work as well.

Best served warm in a shallow bowl with some extra sauce for dipping. Goes great with a warm drink like koko Samoa.

Please note:
Coconut is a laxative if enough is eaten. Be sure to watch your intake!


Recipe: Thai Iced Tea

Thai Iced Tea Recipe

Ingredients:

  • 2/3 cup Thai tea leaves
  • 1 2/3 cup Water
  • 1/2 cup Sugar
  • 1 1/2 cup Evaporated Milk (12oz can)

Directions:

Bring water to a boil in a kettle then remove from heat. Add Thai tea leaves and steep for 5 minutes; remove tea leaves. Stir sugar into tea until dissolved. Cool to room temperature. Fill glasses with ice; pour tea into each glass until almost full. Stir in desired evaporated milk into each glass.

Serves 3-4


Recipe ~ DIY Healthy Nutella!

binnyNutellaNutella is so yummy and addictive, but have you ever looked at the list of ingredients on the jar?

Sugar, vegetable oil, hazelnuts (13%), skim milk powder, reduced fat cocoa powder, emulsifier and flavoring.

Not exactly the healthiest, however you can easily make your own using just a few wholesome ingredients!

The secret to making any nut butter is to keep blending.

Don’t be disheartened if your butter still isn’t smooth within the first few minutes, it can take up to 10 minutes of constant processing before it reaches desired consistency.

Ingredients

2 cups roasted hazelnuts
1/2 cup maple syrup
1/2 cup cashew milk
1/4 cup cacao powder
2 Tbsp. coconut oil
1 tsp. vanilla essence
1/4 tsp. celtic sea salt

Directions

Put the hazelnuts into a food processor or blender and blend on medium speed for a few minutes. You might have to scrape down the sides as you go.

Add all the other ingredients and keep blending with the speed on medium, again scraping down the sides if need be. It should take up to 10 minutes before it turns into a smooth, delicious butter.


Healthy Recipe ~ Crunchy Coconut Crumble Ice Cream

Crunchy Coconut Crumble Ice Cream contains no white sugar, and uses raw and plant-based ingredients. If you like this recipe, you'll love our upcoming 7-Day Snacks & Dessert Challenge!
Crunchy Coconut Crumble Ice Cream contains no white sugar, and uses raw and plant-based ingredients. If you like this recipe, you’ll love our upcoming 7-Day Snacks & Dessert Challenge!
This recipe will knock your socks off, and I am confident that it will convince any one – plant based eater or not – that raw and plant based desserts can be just as satisfying as their ‘junk’ food counter parts. This recipe is really simple to prepare, and you can have the components on hand in your freezer, ready to be mixed up whenever your sweet tooth calls you. I do recommend that you keep the two components separate until you are ready to munch to maintain maximum crunchability :)


Ingredients:

Crunchy Coconut Crumble:

(makes at least 20 servings, depending on how much crumble you want in your ice cream)

  • 1 cup oat groats – ground into a flour
  • 2 cups toasted coconut flakes – you can purchase pre-toasted coconut or toast your own at home.
  • 1 cup almonds, chopped
  • 3 cups fresh dates, pitted
  • 1/2 cup coconut sugar
  • 1 tsp cinnamon powder
  • 1 tsp vanilla powder or vanilla extract
  • pinch of salt

Ice Cream:

(This is for one serving of ice cream)

  • 2-3 frozen, peeled bananas
  • 1/2 tsp vanilla powder or extract
  • 1/4 cup coconut or almond milk
  • 1/2 cup crumble balls

Directions:   To make your crumble, place your oat groats, coconut sugar, chopped pitted dates, cinnamon powder, vanilla and salt in a blender or food processor and pulse until a sticky cookie dough like consistency is reached. Remove from your blender or food processor and stir coconut flakes and chopped almonds in by hand to maintain their shape and crunch. Form into 1/4 inch balls and place in the freezer. When you are ready to make your ice cream, place your frozen bananas, vanilla and coconut or almond milk in a high speed blender or food processor and process until smooth. Remove from your machine and stir in your crumble mixture. Enjoy!


Grounded Nutrition ~ 7-Day Snack & Dessert Challenge ~ Sept. 29, 2014

GNlogo1

Click image for website

If everyone on the planet was living as vibrantly and as healthy as possible, it would be a much different living experience for all of us.

Our mission is to empower humanity to shift into our natural states of being on all levels; physically, mentally, emotionally and spiritually. We all deserve to live amazing and healthy lives, and it starts now!

Take our FREE 7 Day Dessert And Snack Challenge … Guilt-free snacks and desserts for one week!

Includes 7 healthy snack and dessert recipes, shopping lists, daily group support and more to help you snack the healthy way!

Begins on Monday, September 29th!

Here is how the challenge will work: 

1. Below you will find the shopping lists for every item you will need for all 7 days of the challenge. Collect all your items on the list on the weekend prior to the start date. 

2. Prep any ingredients that need to be prepared ahead of time (such as peeling and freezing bananas.)

3. On Sunday, September 28th we will post your first recipe.  Make that recipe for your dessert, whenever you choose to eat it.

4. Let us know you are following along by taking pictures and sharing them with us as comments to the recipes posted, or just letting us know in comments on the page.

5. Continue on with the following day’s recipe. Repeat steps 3 and 4 until the end of the challenge! Feel free to contact us if you have any questions!

Note:  The following shopping lists are not recipes.  We will post your first recipe on Sunday, September 28th. 

ott32All right!  Get ready to have some fun.  Make sure you get your groceries by the end of this coming weekend!

Shopping Lists: 

Produce:

  • 3 apples
  • 7-8 fresh apricots
  • 4 banana
  • 7 cups fresh dates/medjool dates
  • 1 mango
  • 1 orange

Nuts/Seeds: 

  • 1 small jar almond butter (8oz)
  • 6 cups dried shredded coconut
  • 2 tbsp hazel nuts
  • 1 small jar raw nut butter of choice (8oz)
  • 2 tbsp nuts of choice
  • 1 1/4 cup walnuts

 Grocery: 

  • 1 small box cup almond milk (1L)
  • 2 cups vegan chocolate chips (dairy free – We like Enjoy Life)
  • 1 small container cacao or cocoa or carob powder
  • 1 small can full fat coconut milk (14oz)
  • 1 small container coconut oil
  • 1 small jar maple syrup
  • ½ cup rolled oats
  • Optional:  add-in’s for bliss balls  – chocolate chips, dried cranberries, raisins, carob chips, and the like

Spices/Seasonings: 

  • 1 small jar cinnamon powder
  • 1 bag vanilla powder or 1 small bottle vanilla extract
  • 1 small box sea salt

Preparation list: 

1. Peel and freeze 3 ripe bananas.

2. Peel, dice and freeze mango.

Tools Needed: 

These are all relatively simple recipes, but having a few pieces of equipment will make them all that much easier:

  • 1 Blender or Food Processor
  • 1 Baking Sheet
  • 9×9 Baking Dish
  • Parchment Paper
  • Mixing Bowl
  • Wooden Spoon/Spatula
  • 1 Small Pot
  • 1 Glass or Stainless Steel Bowl (to be used for double boiler)
  • Measuring Cups

Recipe ~ Raw Chocolate Treats

RawChocolateRounds-850x400These taste great with a cup of your favorite organic coffee, or whenever you want a nutritional chocolatey pick-me-up. The cacao and dates are chock-full of vitamins and minerals and are sugar, dairy and nut-free. And the best part? They don’t melt in your bag, so you can take them with you and enjoy them while you travel.

Ingredients

3/4 cup raw cacao powder
1/4 cup of melted cacao butter
2 Tbsp. agave nectar
1/4 cup pitted dates, roughly chopped
2 Tbsp. unsweetened dried cranberries
2 Tbsp. sunflower seeds
1 Tbsp. unsweetened shredded coconut

Directions

Melt the cacao butter on the stove over very low heat. To avoid burning the butter, you can create a makeshift double boiler. Put a little hot water into a metal pot or bowl and then use another smaller metal bowl or metal cup for the solid chunks of cacao butter. Place the smaller metal cup into the larger bowl, and try to be sure that not one drop of water enters the cup with the butter in it. Gently stir the cacao butter while it heats up.

Remove the melted cacao butter from heat and pour into a large mixing bowl. Add the cacao powder and agave nectar and mix thoroughly and quickly. Next add in approximately half of each of the dry ingredients and stir. You will need to be quick with this step to ensure it is mixed well.

On a sheet of baking paper spread out the mixture into an even thickness into the shape of a rectangle. Put a second sheet of baking paper on top and press down firmly on the mixture. You can use a rolling pin if you have one or just give yourself an arm workout by pressing down on the mixture with your hands.

Take off the top layer of baking paper and add the rest of the dry ingredients on top of the mixture.

Fold the edge of the bottom sheet of baking paper towards the centre of the mixture, to roll the mixture over itself (a bit like rolling sushi). Be sure to press down firmly to keep the mixture warm with the body temperature from your hands and to keep the mixture sticking together. Roll until you have a nice fat tube created, and be sure to pull the tube away from the baking paper as you roll.

Alternatively you can roll the outside of the tube across a plate of shredded coconut.

Pop the chocolate tube into the fridge for an hour to make sure it’s nice and hard. This will make it easier to cut into the thickness of rounds that you prefer using a sharp straight edged knife.

Store in a container with a lid and pop a few in a sandwich bag when you’re ready to hit the road. Safe, healthy travels!


Recipe ~ No-Bake Chocolate Oatmeal Cookies

no-bake choco cookies
Ingredients:
1/2 cup butter or 1/2 cup margarine
2 cups sugar
1/2 cup milk
4 tablespoons cocoa
1/2 cup creamy peanut butter (or chunky but is seems to make a more crumbly dry cookie)
2 teaspoons vanilla
3 -3 1/2 cups dry quick-cooking oats

Prep Time:   5 mins.
Cook Time:  1 min.

Directions:
1 – Add the first four ingredients into a 4-quart sauce pan.
2 – Bring to a rolling boil and hold for 1 minute.
3 – Remove from heat.
4 – Add peanut butter into the hot mixture and stir until melted.
5 – Add in vanilla. (almond extract is good also, but I only use 1/2 teaspoon almond and 1 1/2 teaspoon vanilla).
6 – Mix in the oats and drop by tablespoons onto wax paper.
7 – Let cool until set.
8 – *Please remember that even if you do follow the recipe exactly, it doesn’t always turn out just right. I have had these not set up for me AND be hard and dry. But most of the time, the recipe is just right. I have also found that it makes a difference if you use quick cooking oats or old fashioned. In my experience it takes more old fashioned oats than quick cooking and I like the texture of the quick cooking better. When you make it a few hundred times like I have you learn a couple of things:) Also, Chunky peanut butter tends to make them more dry and crumbly.

Recipe ~ Fully Raw Mediterranean Salad, by Kristina

It is hard to believe that raw food could be so good. Below is a good list of ingredients for a yummy alkalizing lunch. Use this recipe as is, or modify ingredients to meet your taste.

  • Raw salad recipe
    Kristina shares a wonderful salad recipe with us. Thank you!

    4 cups kale and romaine

  • 2 cups cherry tomatoes
  • 4 cucumbers diced
  • 1-2 cups sweet baby bell peppers
  • 1 cup diced celery
  • 4-5 homegrown heirloom tomatoes
  • 1-2 cups finely chopped cauliflower
  • Fresh mint and basil, diced
  • 1/2 chopped red onion
  • cumin
  • edible flowers

Mix all the ingredients in a bowl to create a beautiful Mediterranean Salad. Then create the raw hummus recipe below for the dressing. Or use a healthy dressing option of your choice.

Raw Hummus Recipe

  • 1 zucchini
  • 1 cup raw sesame seeds
  • 1 cup lemon juice
  • 1 clove garlic

While we are at it, here is another awesome raw food salad recipe as a bonus for today.

Ingredient List for Yummy Raw Food Salad

  • Spinach or other nutrient dense leafy green
  • Red peppers, the more vibrant the color the better, a great source of vitamin C
  • Apples, adds fiber
  • Sprouts are a wonderful source of nutrition and enzymes.  You can also buy fresh sprouts at the store, if you don’t feel like sprouting your own
  • Pumpkin seeds,  are helpful against parasites, although they are by no means a complete solution. I like to do a parasite cleanse at least 4x year, just to be safe.
  • Dried Cranberries, be sure there is no added high fructose corn syrup
  • Goji Berries, Asian superfood of the great Goji warrior
  • Marinated artichoke hearts. I love to add these whenever I am at a salad bar.
  • Hemp seeds, good source of protein, healthy fats and fiber.

Salad Dressing Ingredients

  • Extra virgin olive oil, organic cold pressed
  • Raw Apple cider vinegar
  • Pure water
  • Liquid aminos

I like to add fresh or dried herbs to my salad dressing.  There is a bulk herb section at the health food store. They have small bottles of a bunch of different single herbs and spices as well as combos.  I like to look and smell, then bring home a new one to try every now and then.  A great way to familiarize myself with some new flavors.

Recipe ~ Bahn Mi, Vietnamese Street Sandwiches with Pickled Veggies


bahn mi

Yield: 4 Sandwiches

Cook Time: 1 hour

Making good banh mi at home is quite easy, but can involve a bit of preparation. Simply put, you can make it as simple or thorough as you want or have time for.

Making Banh mi preparation easier is all about nailing down the assembly. Once you have your basic pantry items for banh mi, it won’t take that much more effort. The carrot and daikon pickles can be made ahead of time and be stored in the fridge for about 1 month.

Ingredients:

Caramel Ingredients

  • 3 Tbs sugar
  • 2 tbs warm water

Pork Ingredients

  • 2 lbs cubed pork belly (about 1 inch cubes) — Vegans, substitute with seitan
  • 2 large shallots, minced (about 3-4 tablespoons)
  • 1 tablespoons oil
  • 2 garlic cloves, minced
  • 2 tablespoons of fish sauce
  • about 1 or 1.5 cups of water
  • 1/2 teaspoon whole black peppercorns

Banh Mi Assembly (not all required, some are optional):

  • 1 french baguette
  • pickled carrots and daikon (recipe, below)
  • fresh cilantro
  • soy sauce
  • pork liver pate
  • mayonnaise
  • thin slices of chili pepper
  • thin slices of cucumber

Directions:

For the nuoc mau (Vietnamese caramel sauce)

  1. Add sugar and water to heavy bottom sauce pan. Heat pan on medium heat and let sugar melt. As sugar begins to melt, the mixture will begin to turn to a golden brown. Using wooden spoon, stir the mixture occasionally.
  2. Do not leave the caramel sauce unattended! Once the sugar begins to melt, it will turn color very quickly. As soon as the mixture turns to a medium golden brown, immediate remove pan from heat.
  3. If the mixture is still too thick, SLOWLY and CAREFULLY add additional water 1 tablespoon at a time until the mixture becomes more watery consistency. Adding the addition water to the HOT caramel will splatter, so be careful. Quickly mix with a wooden spoon so that there are no hard lumps. When finished, set aside.

For the Pork:

  1. In medium to large sauce pan (or dutch oven), turn on heat to medium. Heat oil, then add shallots. Slowly cook shallots for about 1 minute, then add garlic. Cook both until they become soft and fragrant. Add pork belly. Cook pork belly for about 10 minutes or until all the edges are seared and browned.
  2. Add fish sauce and cook pork belly for about another 5 minutes. Add about 1 cup of water. If you need more water to cover the pork, add more until the pork is covered. Add the peppercorns. Turn heat to low and cook for about another 10 minutes. Stirring occasionally. Then add the caramel sauce.
  3. Continue braising the pork on low heat for about another 45 minutes to 1 hour, or until pork is tender. Stir occasionally.

For the Banh Mi assembly:

  1. Slice baguettes lengthwise. Add the ingredients that you want (or like) to the banh mi. Add slices of the pork belly.
  2. Enjoy!


viet pickled veggies

PICKLED VEGGIES FOR BAHN MI

1/4 lb. cucumber, julienned
1 lb. daikon, peeled and julienned
1 lb. carrots, peeled and julienned
2 tsps kosher or sea salt
1 cup unseasoned rice vinegar
1 cup sugar
1 cup water

Make sure the vegetables are fairly dry (pat them dry) so they don’t dilute the pickling liquid with excess water. Combine the vinegar, salt, sugar, and water together until the sugar dissolves. Place the vegetables in a jar large enough to fit them all and pour the pickling liquid into the jar so that all of the vegetables are submerged. Store them sealed in the jar in the refrigerator for 5 days for best flavor.


CPM Makes Its Way To Food And Wine Magazine

Click on image for original article

Our Reiki Grandmaster Trish Lee and Reiki Sensei Amelia Rea are in a recent Food & Wine Magazine article!

CPM's avatarCook Plant Meditate

7-7-12 204

We are so excited!  Food and Wine Magazine picked up one of our Campfire Cooking posts for its article 6 Awesome Foods You Didn’t Know You Could Cook On A Camping TripYou can check out the article at fwx.com and you can view our original post Campfire Cooking Post #8-Campfire Pizza On The Columbia River here.  Thanks to Noah Kaufman for including us!

Please check back for more awesome campfire cooking recipes from CPM. 

Best,

CPM

View original post

Posted in UncategorizedTagged

Recipe ~ Three Mini Cheesecakes

fruit cheesecakes mini
Cherry/Blueberry Mini Cheesecakes with Vanilla Wafer crust
choco cheesecakes mini
Chocolate Mini Cheesecakes with Oreo Cookie crust
matcha tea cheesecakes mini
Matcha Green Tea-flavored Cheesecake with Shortbread crust

Ingredients

Cheesecake Base:
2 packages cream cheese
3/4 cup sugar
1 teasppon vanilla
2 eggs

Toppings/crusts

For fruity Cheesecake:

Nilla wafers for crust
1 can blueberry or cherry filling

For chocoholic Cheesecake:

Oreos for crust and to crumble on top
Chocolate Pudding/milk for topping

For Matcha Cheesecake:

1 1/2 Tablespoons Match Green Tea Powder (Sold online)
1/2 recipe of Shortbread cookie for crust

Directions

  1. Preheat oven to 350 degrees.
  2. Beat cream cheese, eggs, vanilla, and sugar with mixer.
  3. Place 1 vanilla wafer/oreo/cookie (if doing shortbread crust pre-bake for 10 minutes) on the bottom of each cupcake liner (make 18).
  4. Pour batter on top of cookie.
  5. Bake for 15 minutes.
  6. Chill then top with filling/pudding and oreo crumbs/whipped cream! YUM


Makes 18 mini cheesecakes.


Recipe ~ Hawaiian Shortbread Pie Crust

Just three ingredients is all you’ll need to make this shortbread crust. They are most likely ingredients that you already have stocked in your pantry, too! Flour, sugar, and butter. Just those three things make one of the most delicious crusts that is versatile for so many delicious desserts and sweet treats.

Ingredients
  • 1 cup (2 sticks) salted butter, softened
  • 2 cups all-purpose flour
  • ½ cup confectioner’s sugar
Instructions
  1. Preheat oven to 350º F.
  2. Mix together butter, flour, and confectioner’s sugar. Press into the bottom of a 9×13-inch baking pan, a pie plate, tart pan, or other pan for your baking.
  3. Bake for approximately 12-15 minutes, or until lightly golden brown.
  4. Remove from oven and allow to cool completely before filling.

Recipe ~ 5-Minute Cacao & Superfood Smoothie

CreamyCacaoCoconutSmoothie

(Serves 2)


Ingredients

  • 1.5 cup coconut water
  • 1/2 cup coconut flesh
  • 1/2 banana
  • 1/2 cup of your favorite berries (here I’ve used frozen raspberries)
  • 1 Tbsp. hemp powder
  • 1 Tbsp. cacao powder
  • 2 Tbsp. chia seeds
  • 1 Tbsp. maca

Toppings

  • Pistachios
  • Hemp seeds
  • Cacao nibs

Directions

Blend all ingredients into your high-speed blender until well combined and serve with your favorite toppings.

Here I’ve used pistachios, hemp seeds and cacao nibs for toppings.


Recipe ~ Vegan Macadamia Chocolate Bark

Chocolate-Macadamia_square-850x850This dessert takes around five minutes to prepare and less than 30 minutes to set. It’s perfect if you have a craving for chocolate or you have unexpected guests turn up.


Vegan Macadamia Chocolate Bark

Serves 8

Ingredients

  • 1/3 cup coconut oil
  • 2 Tbsp. organic maple syrup
  • 1/3 cup organic cacao powder
  • 1/2 cup macadamia nuts


Directions

Line a plate or baking tray with baking paper, place the macadamia nuts on top.

Add coconut oil to a small saucepan on low heat and stir until melted.

Remove from the heat and add the organic maple syrup, whisking briskly until well combined.

Add the cacao powder, stirring until well combined.

Pour the chocolate over the macadamias, ensuring that they are evenly coated.

Place in the refrigerator or freezer to set for 20-30 minutes.

Take out and break apart to serve.


Recipe ~ Oreo-Banana Sponge Cake

Click on image for link
Click on image for recipe link
I hated the heat during hot summer days in August, really looked forward to autumn. Simply love awesome autumn in Kyoto, the weather, the food and the momiji (Japanese maple) of course. It is here! As the weather getting cooler, I feel comfortable working in the kitchen even when the oven is on. So, here come this oreo-banana sponge cake that was on my to-bake list for long.
I used a pack of 70g oreo cookies the I hid from my boys, personally I think it would be nicer with more cookies or chunks of brownie. Otherwise, it was moist and fluffy with right sweetness. Coffeeholic me had it with iced coffee, but I bet it will get along with tea too. Enjoy!


Posted in UncategorizedTagged

Recipe ~ Chocolate Haupia Pie

Ingredients:
1 frozen pie crust (small)
1 cup sugar
1 cup milk
1 can coconut milk
1 cup water
½ cup cornstarch
7oz. semi-sweet chocolate
1½ cups heavy whipping cream
¼ cup sugar

Instructions:
Preheat oven at 350 degrees.
If using a frozen pie crust. Prepare pie crust according to directions.
Whisk the following ingredients: sugar, milk and 1 can coconut milk.
Next, stir water into cornstarch and set aside.
Pour coconut milk mixture into sauce pan and bring to a boil, then turn heat lower to a simmer and whisk in cornstarch continually until thickened.
Melt chocolate pieces in a microwave for just a minute.
Separate the haupia mixture equally. Pour half the mixture into the melted chocolate and stir together and fill bottom of pie crust. The other half pour on the top of mixed chocolate.
Refrigerate the haupia pie for at least 1 hour.
Whip heavy cream with remaining sugar until peaks are formed and add to pie.
Refrigerate for another hour and enjoy!

Recipe ~ Double Chocolate Nutella Toffee Skillet Brownies

Nutella Skillet Brownies
Yield: 1 10″ Brownie
Prep Time: 10 Minutes
Cook Time: 30 Minutes
Total Time: 40 Minutes

Ingredients:

1/2 cup Butter, melted and cooled
3/4 cup Nutella, or chocolate hazelnut spread
1/2 cup Brown Sugar or Coconut Sugar
1/2 cup Sugar
2 Eggs
1 tsp Vanilla
1 tsp Baking Soda
1/2 tsp Salt
2 cups Flour
2 Tbsp Cocoa Powder
1 cup Semi-Sweet Chocolate Chips
1/2 cup Toffee Pieces, like Heath Bits o’ Toffee

Directions:

Preheat oven to 350 degrees. In a large bowl with a whisk or spatula, butter, Nutella, brown and white sugar, eggs, and vanilla until smooth. Stir in the flour, salt and baking soda until a batter forms.
Stir in 3/4 of the chocolate chips and 1/4 cup of the toffee pieces.
Spoon the batter into a oven proof skillet, cast iron or stainless steel that has been sprayed with non-stick spray. Even the batter out and press to within 1/2″ of the edges of the skillet – the brownie will spread out, but leave the room between the batter and the sides of the skillet so the edges don’t over cook.
Top with remaining chocolate chips and toffee bits. Place in oven and bake for 25-30 minutes or until the edges are set and a toothpick placed in the middle of the brownie comes out clean.
Let the brownie cool on a wire rack in the skillet until just warm – about 45 minutes. It will still be very soft in the middle, but as it cools, the brownie will set entirely.
Drizzle with additional softened Nutella if desired, or ice cream!

Recipe ~ Vegan Macaroni & Cheese

vegan mac cheese

Ingredients

  • 1 small onion, finely chopped
  • 1/4 cup earth balance vegan butter (or regular butter)
  • 1/4 cup flour, I used spelt
  • 3 cloves garlic, minced
  • squeeze of lemon
  • 1 cup coconut milk
  • 1/4 cup nutritional yeast (not regular baking yeast)
  • 2 tablespoons dijon mustard
  • 2 tablespoons tomato paste
  • 2 teaspoons turmeric
  • 1/4 to 1 teaspoon smoked paprika (to taste), plus a little more on top
  • 8-12 oz elbow pasta, I used this brown rice brand
  • 1 to 1-2 cups pasta water, use a little at a time
  • 1 cup frozen peas
  • salt & pepper
crusty topping:
  • 1/4 cup panko bread crumbs
  • 1/4 cup chopped pine nuts
  • pinch of cayenne & smoked paprika
  • drizzle of olive oil on top before baking
  • salt & pepper

Instructions

  1. Heat butter in a medium pot over medium heat. Add onions, a few pinches of salt, and simmer until translucent (about 5 minutes). Add flour and whisk to thicken. Add garlic and cook for a few more minutes on medium-low.
  2. Add a good squeeze of lemon and stir to make sure nothing is sticking to the bottom of the pan. Add coconut milk, nutritional yeast, mustard, tomato paste, turmeric, paprika, and a few more pinches of salt. Let simmer, stirring occasionally, for about 15 minutes. Meanwhile, cook your pasta.
  3. Optional step – vitamix the sauce together to make the sauce really creamy.
  4. Taste and adjust seasonings. In a large bowl stir together the cooked pasta, some of the sauce, and peas. Stir in pasta water as needed to thin the sauce. You can stop here and serve this now if you like, or continue on to bake it.
  5. Preheat oven to 450 degrees. Place everything in a baking dish, add more pasta water and possibly more sauce. This will dry out a little while baking so make sure it’s really creamy first. Add the breadcrumbs, panko, a little more salt, cayenne, and paprika on top. Drizzle with a little bit of olive oil and bake for 8-10 minutes, just until the crust starts to become golden brown. Serve with extra sauce.

Recipe ~ Sweet Pepper Panzanella

sweet pepper panzanellaPanzanella: it’s your excuse to eat bread and call it salad!

Ingredients

2-3 sweet peppers (red and/or yellow)
olive oil
sherry vinegar (or balsamic or white wine vinegar)
pinch of sweet or smoked paprika
toasted stale bread, rubbed w/ olive oil & garlic
1 cup cherry tomatoes
1-2 leaves of kale, torn
1/2 cup little mozzarella balls
1/4 cup chunky pickled onions (see below)
handful of torn basil
salt & pepper
pickled onions:
1 small red onion, sliced into thick strips
white wine vinegar (enough to fill the jar of onions)
a few pinches of cane sugar and salt

Instructions

For the pickled onions: (make in advance) pickle your onions by shaking all ingredients together in a jar. Chill until for at least an hour, or up to days (or weeks, really) in advance.


Slice cherry tomatoes and toss them with a splash of olive oil, a splash of sherry vinegar, salt, pepper.


Drizzle olive oil on your stale bread and toast (or grill) it until golden. While it’s still warm, rub it with a sliced clove of garlic, then slice it into bite sized pieces.


De-seed and slice your peppers into thick strips. Sautée them in a pan with olive oil until soft and lightly blistered. (you could also do this on a grill). Remove from heat, drizzle with a little sherry vinegar and a pinch of paprika.


Toss all salad ingredients together so that the juices from the tomatoes and the peppers create a light dressing. Drizzle with a little more olive oil. Taste, and add more salt and pepper to your liking. Let it sit for at least 10 minutes or so for the bread to soak up the juices. Serve at room temp.

Notes

Instead of pickled onions, you can also cook onions with your peppers. Use a yellow onion instead of a red one.

Vegan option:  skip the cheese

Yield: serves 3-4 as a side

Recipe ~ Nutella and Banana French Toast Roll-Ups

nutella_and_banana_french_toast_rollups1These french toast roll ups are stuffed with one of the best flavor combinations out there – banana and nutella.  They’re just sweet enough to eat by themselves, but you can always sprinkle them with cinnamon sugar or drizzle some syrup over the top if you want to go over the top.

 ingredients:

  • white bread – 10 slices, crusts removed
  • nutella – about 1 cup
  • bananas – 2, cut into 10 strips
  • eggs – 1, large
  • milk – 2 tbsp
  • vanilla – 1/2 tsp
  • butter – 2 tbsp

how to:

  • Roll each slice of bread very thin with a rolling pin.  Spread each slice with a generous amount of Nutella – covering one side completely.  Place a strip of banana at one end and roll the bread up tightly.
  • In a small bowl, whisk together the eggs, milk and vanilla until combined and set aside.
  • Heat the butter in a skillet over medium heat.  Dredge each roll through the egg and milk mix, then cook on all sides in the hot butter until golden brown.
  • Serve while hot.

Health & Wellness | Stay Hydrated This Summer With This Watermelon Green Juice

WatermelonSlicingOnCuttingBoard-850x400

This watermelon juice has loads of fresh, hydrating greens like cucumber, romaine lettuce, and celery, not to mention our superfood friend, kale! Plus, it’s got lime and watermelon to sweeten it up and hydrate the body. Next time you need something refreshing, give this a go.

Watermelon Green Juice
Serves 2

Ingredients

  • 1 small-medium head of organic romaine lettuce
  • 3 cups cubed watermelon
  • 1 cucumber (peeled if not organic)
  • 2 small limes (peeled)
  • 5 stalks of organic celery
  • 5 stalks of organic kale

Directions

Wash and prepare all of your produce, cutting to fit your juicer’s shute if necessary.

Start by juicing your romaine lettuce. If your juicer has settings, use the lowest one for the lettuce.

Then, juice the remaining ingredients.

Fresh juice is best immediately after you make it; however, it will pack a good nutrient punch for up to 24 hours after it’s made if stored in an airtight container, filled to the very top, and sealed with a lid. (Sometimes I’ll add a little water if I don’t have enough juice to fill it to the top.) Mason jars with resealable lids work great for this.

Store in your refrigerator.


Recipe ~ Mango Chutney (Chhunddo)

Chhunddo_med

Ingredients

  • 1 kg mango- raw, peeled, shredded and discard seed

    1 kg sugar

    250 gm salt

    30 gm cumin powder

    20 gm chilli powder

    1 tsp turmeric

Method

Mix all ingredients together and sun for a few days.

Stir off and on, till sugar dissolves and gets sticky.  This should take about 5-7 days.

Key Ingredients:  Turmeric, Salt, Sugar, Mango

Recipe ~ Apple Crumb Cake with Brown Sugar Custard

apple-crumble-loafApple Crumble Loaf with Brown Sugar Custard

(makes one medium loaf cake, serves about 8-10)

For the cake:
225g self-raising flour (about 1 & 3/4 cups)
125g butter, softened
120g sugar
2 eggs
1 tsp pure vanilla extract
2 tbsp milk
3 Granny Smith apples, peeled, cored and thinly sliced
1 tbsp brown sugar + 1/2 tsp ground cinnamon

For the crumble:
125g self raising flour (approx. 1 cup)
90g sugar
45g butter
1.5-2 tbsp water for mixing
1/4 tsp ground cinnamon

For the custard:
3 large egg yolks
75g brown sugar (about 1/3 cup packed, can replace with 75g golden syrup)
300ml pouring cream (about 1 & 1/4 cups)
150ml milk (about 1/2 cup + 1 tbsp)
1 vanilla bean pod or 1 tsp pure vanilla extract

Grease and line a 20cm x 10cm (8x4inch) loaf tin with baking paper. Prepare the cake batter; preheat oven to 180°C (350°F). Place sugar and butter in a large mixing bowl and beat with an electric mixer on high speed until pale and fluffy. Add eggs one at a time, then add vanilla and beating until combined. Reduce mixer speed to slow and gradually add flour and and milk and mix until just combined. Pour batter into prepared tin and smooth surface with a spatula. Layer apples slices over the top of the batter, there should be enough for two layers of slices. Mix brown sugar and cinnamon together in a small bowl and sprinkle evenly over the top of the apple slices.

Prepare the crumble; place butter, flour, cinnamon and sugar in a bowl and rub the mixture gently between the tips of your fingers to combine them, until the mixture resembles breadcrumbs. Gradually add a 1/2 tablespoon of water at a time, while still combining with your fingertips until the mixture starts to form fairly bit clumps of around 0.5 cm diameter, rather than fine breadcrumbs. I added about 2 tbps water.


Bake in oven for 50-60mins, or until a skewer inserted into the centre comes out clean and the crumble on top is golden brown. Remove from the oven and cool completely in tin. Serve while still warm (and should be heated before serving always).

Prepare the custard; place milk, cream and vanilla (pod split and seeds scraped) in a medium saucepan and bring just to the boil. Set aside to cool for a minute. Place egg yolks and sugar in a medium mixing bowl and whisk until pale and sugar has dissolved. While still whisking, gradually add hot mixture to the bowl until completely combined. Return mixture to the saucepan and place on low heat, stirring continuously. (And I mean continuously, unless you want to end up with scrambled eggs.) Stir until mixture thickens and coats the back of a wooden spoon. Remove from the heat and transfer mixture to a bowl. Cover surface of mixture with clingfilm to prevent a skin forming. Chill in the fridge until ready to serve.

Cut cake into slices and serve warm with custard or cream or ice cream. Trust me, it’s not even half as good at room temperature. Can be stored in an airtight container in the fridge for several days.

Recipe ~ Native American Frybread and Tacos

homemade-indian-taco

Living in Vallejo, California, for many years, I had the privilege of being in close proximity to the place where the local Native American tribes would gather every summer for a Pow Wow … and no summer is complete without at least one Fry Bread meal!  Even if you can’t make it to the next Pow Wow, here’s a great recipe you can create to join in the festivities and be there in spirit!  AHO!
 
Prep time   :   5 mins
Cook time  :   10 mins
Total time  :   15 mins
 
Serves: 4
 
Ingredients …
  • For the Frybread:
  • 2 cups all purpose flour
  • 2 teaspoons baking powder
  • ½ teaspoon salt
  • ½ cup milk
  • ½ cup water
  • Additional ¼ cup flour for shaping
  • 2 cups oil for frying
  • For the Tacos:
  • 4 cooked frybreads
  • Cooked pinto beans
  • Taco meat*
  • shredded cheese
  • lettuce, tomato, onion
  • hot sauce, pickled jalapenos
Instructions
  1. Whisk the flour, baking powder and salt together. Combine milk and water in a separate cup.
  2. Add wet ingredients to flour mixture and stir with a fork to mix well. You will have a soft dough.
  3. Flour your counter top well with the remaining ¼ cup flour and coat your hands, too.
  4. Shape the dough into a cylinder and cut into 4 pieces.
  5. Pat each piece out into a circle about ⅓” thick (1 cm) and 6″ across.
  6. Heat the oil to 350 degrees F and fry breads one at a time, for about 2 minutes on each side.
  7. Drain upright.
  8. Serve topped with beans, meat, cheese, and vegetables of your choice.
Notes:  Vegans can substitute Tempeh grounds or soy grounds for the ground beef.  Here are the ingredients to create your taco meat for this recipe …

    • ½ cup diced onion
    • 1 teaspoon cumin seed (or ½ teaspoon ground cumin)
    • 1 tablespoon chili powder
    • 1 jalapeno, minced
    • 2 cloves garlic, minced (2 teaspoons)
    • ½ teaspoon crushed red pepper (optional)
    • 1 pound lean ground beef or 1 pkg. of Vegan grounds
    • ½ cup water, beer, or beef stock
    • 1 teaspoon dried oregano
    • ¼ teaspoon salt
    • For serving:   shredded cheese, lettuce, tomato, sour cream, avocado, salsa